Did you know that during the last year sales are mounted to more than 1.47 trillion dollars?
This exponential growth has become possible with tools like Shopify for WordPress that allow anyone to build their own online profitable store and start selling.
There are several plugins for WordPress Online Store, but Shopify is a powerful solution because of its simplicity and flexibility.
In this article, we'll show you how to create an online store with Shopify WordPress Integration.
Step by Step Guide on How to integrate Shopify store with WordPress
Why Shopify ?

Shopify is an online Shop platform that allows everyone to build an e-commerce without technical knowledge.
It is a self-hosted platform, which means that all data remain in your store on their servers.Also , you can use it with your WordPress with your own domain name.
I will just mention some of the main functionalities of this amazing e-commerce platform
If you already have a WordPress site, then you can easily sell your products using Shopify without having to worry about all the technical aspects of an online store.
Such as the development of an SSL certificate, integrate different payment solutions, manage the shipment, worrying about the management of taxes, etc.
it also offers many ways to sell depending on the plan you have chosen like facebook, twitter, and Pinterest.
In other words, it is a powerful online shop solution for beginners and for experts in e-commerce management.
Related Topic : how to start a successful shopify store.
Setting up your Shopify store for WordPress
First, you must visit the Shopify site to register for the free trial of 14 days. No credit card is required for registration and plans start at $ 29 / month after the test.
The test button takes you to the Shopify website. Enter your e-mail address, enter the password, and choose a name for your store.
When finished, click "Create your Store" to continue.
After registering, go to your WordPress site, install and activate the plugin Shopify eCommerce Plugin .
For more details, see our step by step guide visit their Guide in plugin area in WordPress.
Alternatively, you can go to Shopify after setting up you account and Go home and scroll Down and locate WordPress, install the plugin
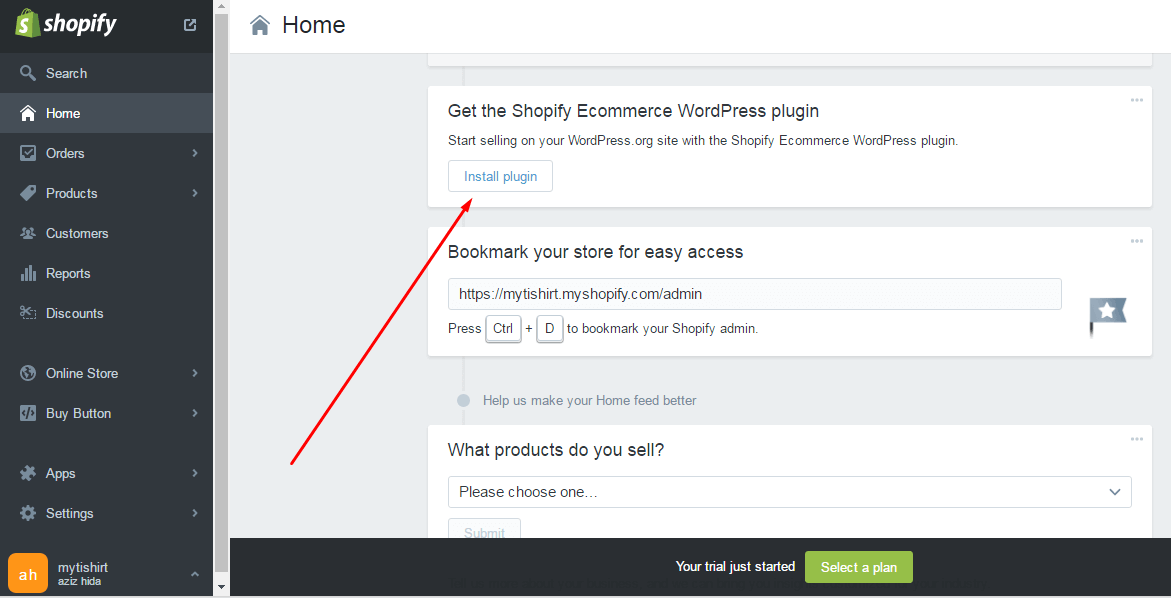
After activating the plugin, it will add a new item to the menu called 'Shopify' in your WordPress dashboard. You have to click it to configure your Shopify account.
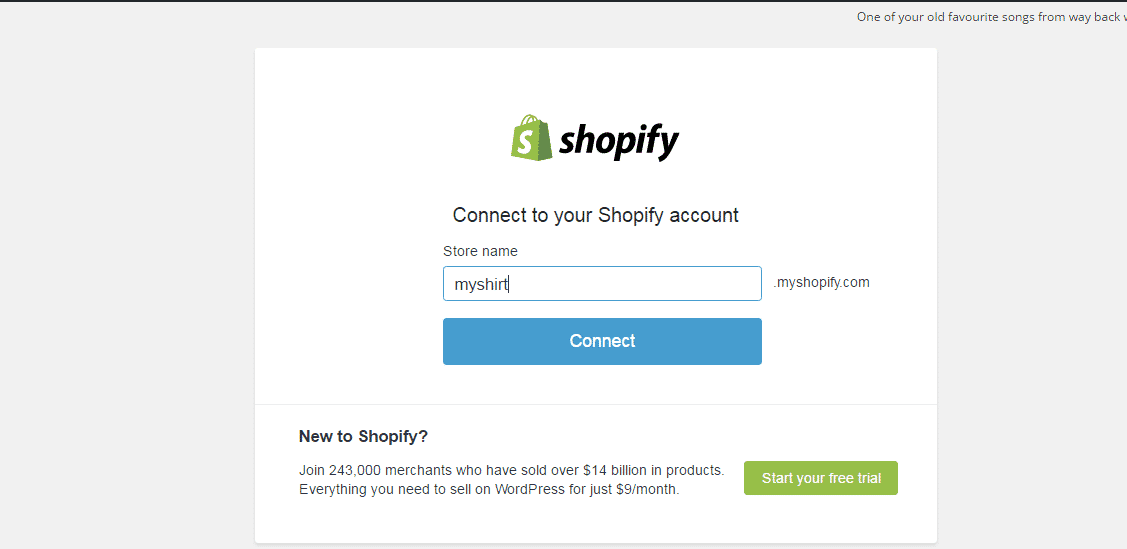
Since you have already created your Shopify store, simply enter the name of your store and click the login button (Connect).
Shopify connect your WordPress site to your Shopify account and you will see the page of the Shopify settings.
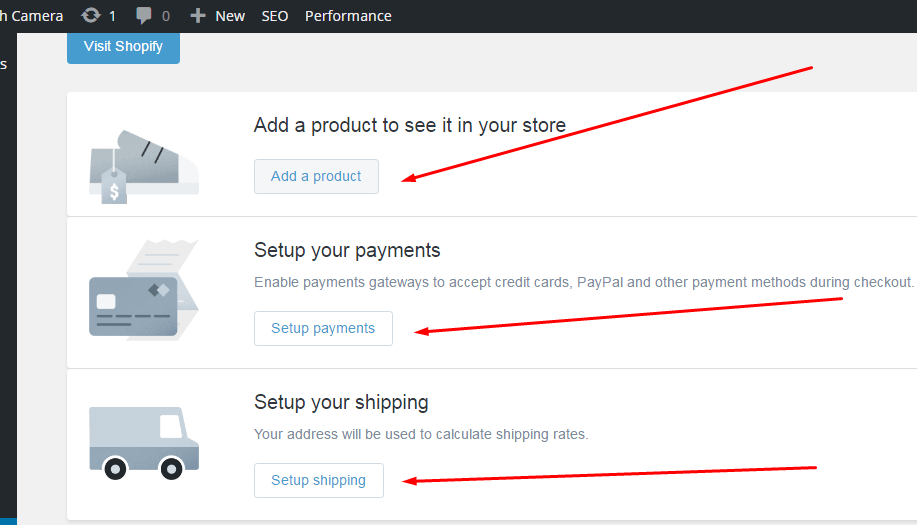
There are three things you should do after creating your Shopify store. First, you need to add some products to your store.
After that, you must configure payment methods and shipping.
Let's start by adding the first product to your Shopify store. Just click on the button "Add a product".
This will open the product page on adding Shopify. You must provide a title and description for your product and then send some pictures.
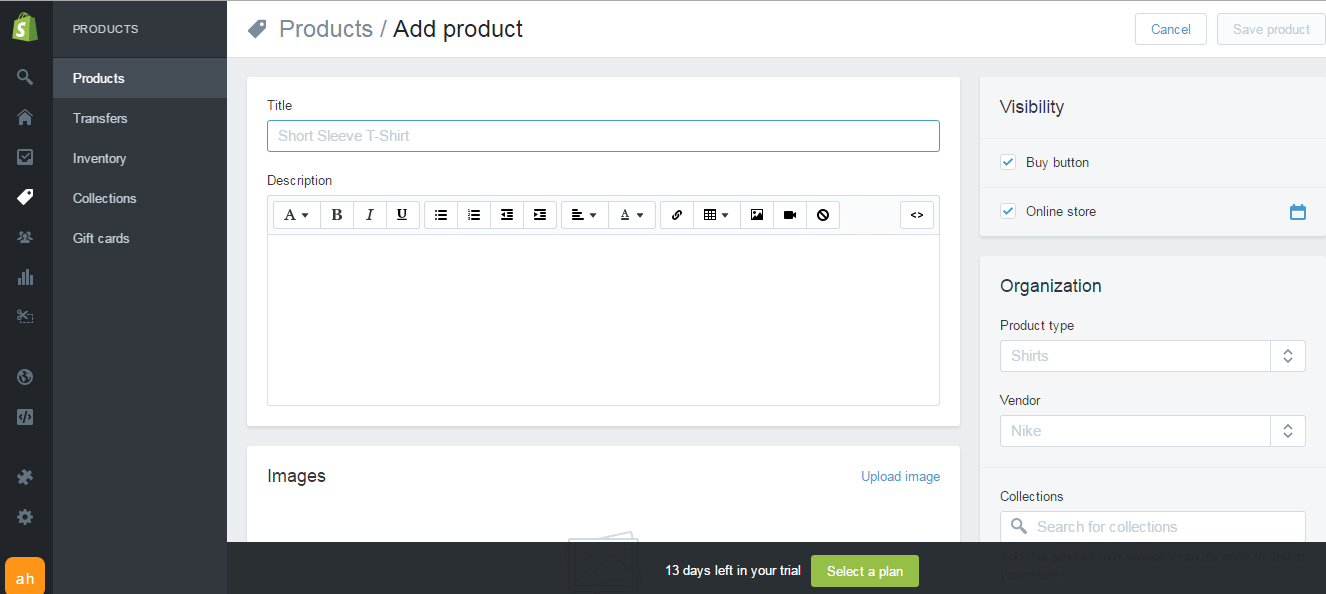
Scroll down to set a price for your product, add shipping, and inventory information. Click the "Save" button when done.
Repeat this process to add more products.
Then you must configure payment methods. Return to your WordPress dashboard and go to "Settings> Shopify".
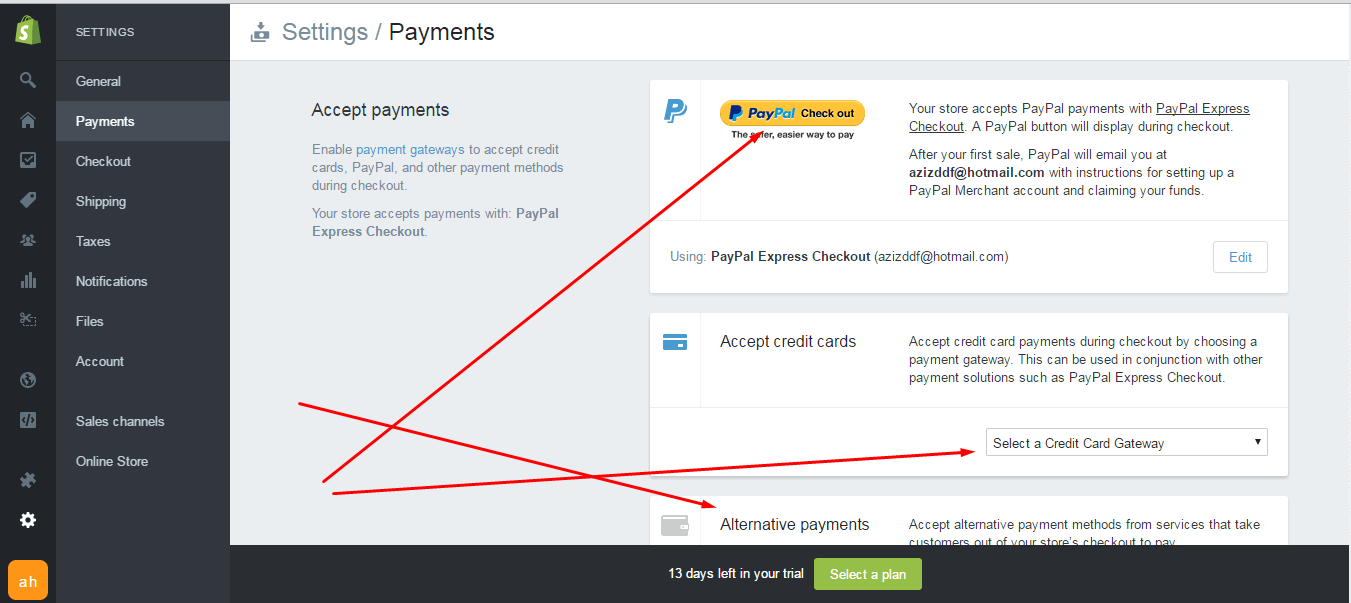
Simply click the payment button configuration (Setup Payments) to continue. See the pic above.
This will take you to the configuration page of payments on Shopify.
Shopify supports many popular payment gateways including PayPal, Stripe, Authorize.net, Skrill, and much more.
By default, Shopify will use the email address you used to register on Paypal Express Checkout.
If you want to use PayPal with this email address, then you're ready to go. You can change this email address and use another email address if you want.
If you want to add other payment methods, then you can select this page. You will be prompted to provide additional information to connect to your Shopify payment method.
Once you have activated your preferred payment methods, you can return to your WordPress site.
The last option you must configure is shipping. Go to the page Shopify settings on your WordPress website and click 'Shipping Setup.
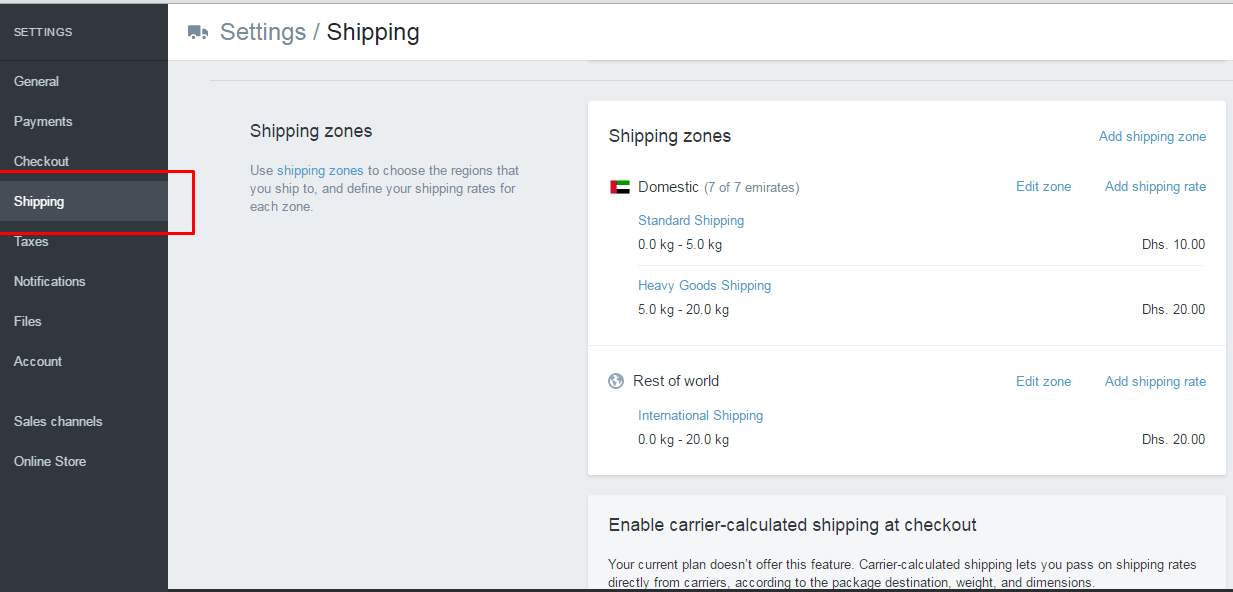
Settings Shipping in shopify
This will take you to the configuration page in Shopify (above ). You must first enter the sea-based information.
After that, you must enter the maritime areas, and how much it would cost to ship to these areas.
Shopify makes it super easy to configure shipping options depending on the price of the order and weight.
You can offer free shipping and add areas for international shipping.
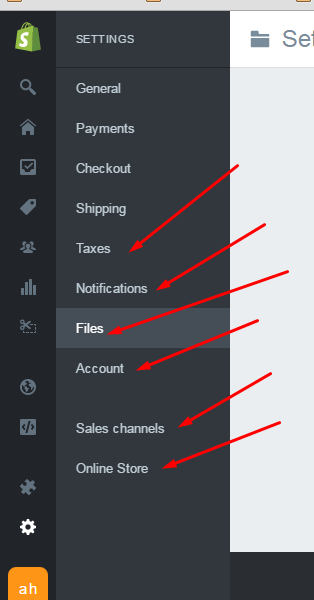
After entering shipping information, you have completed the basic configuration Shopify. Feel free to explore the Shopify dashboard to see what you can change.
How to add a Shopify product on WordPress
Clicking on create the new post like normal and you will access the list of your products you have created in an earlier stage.
You can add an individual product or add a collection.
Then click on the complementary product button to continue. Now you will be asked what kind of integration you want to add.
You can add a Buy Now button with a picture of the product, or you can simply add a Buy Now button only
If you plan to add information and details about the product, you can use the Buy Now button.
This way, you can create different galleries of images for your products using Envira Gallery.
If you just want to display a product, select the image, price, and integration button.
That's all, you can now publish your article or page. visit the page or article in question to see how it all looks like.
You can also display products and collections in your WordPress sidebar. Just go to "Appearance" Widgets ".
Find Shopify widget in the list of available widgets. Add the widget to a sidebar where you want to display a product or collection.
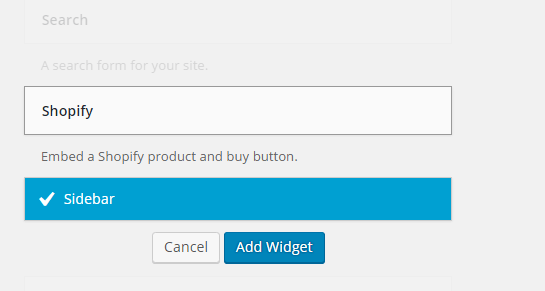
In the widget settings, click on the "Add Product" button to select the products or collections you want to add.
Then click the Save button to save your widget settings.
You can now visit your site to see how your products are displayed in the sidebar.Great!
Choosing Shopify Theme
1-Shopify has its own store of official themes.
These themes are guaranteed to have a complete monitoring of designers, so you know you are in good hands.
Here is post that will help you choose a good one
All themes come with an easy to understand List of changes you can make without having to touch a single line of code.
The premium themes offer more changes, but I do not want you to believe that you can not do something good with a free theme.
These changes are explained in the following section.
To find a theme that suits your needs, we recommend that you read more.
Log on Shopify and go to the store topics by going to https://themes.shopify.com. You will find over 200 variations of themes, and many of them are free.
You can filter the free or paid, by industry or functionality.
You can also sort them by price, popularity and date of publication.
Once you get the theme you like, Check other features like mobile responsiveness and descend down to read some reviews and find out what other users think about the theme.
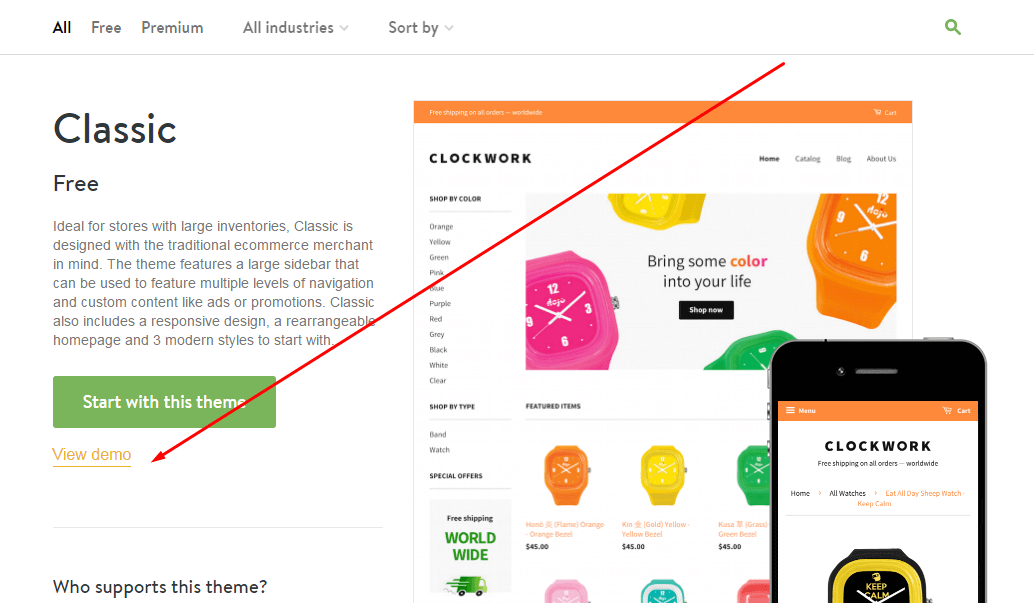
To see the theme in action, click "View Demo". Once you are satisfied go for that theme.
2- considering the Third party in selecting your theme; Choosing a good theme is an investment that can make a difference.
The aesthetic seriousness displayed by your future online store is one of the important factors considered by your visitors/buyers .
I recommend choosing a good design to by considering ThemeForest. they offer quality e-commerce Shopify theme and at affordable and reasonable prices and great support .
A quality template is always a worthwhile investment. There are still very good free templates if you suffer low budget and just started.
Aside from These , the Shopify offers a number of great Apps that could help you boost your e-commerce presence and make more sales ,Attract new visitors, improve customer retention and manage your SEO, sell on new channels, and promote your products.
Just visit their link here and explore it yourself.
Conclusion
Shopify is one of the best SEO compatible e-commerce solutions.
Creating an online store using this Platform is very easy, with many great features, allow to greatly facilitate the management store.in Short it worth a try.enjoy shopifiying.
Your comments and feedbacks are highly appreciated.
Sell online with Shopify Platform
Join 1million + businesses worldwide
