Are you asking the question; "how to start a successful blog? and where to start? ". I'm really glad you arrived here!
In this article, I will guide you step by step in how to start a blog wordpress.
There are no technical prerequisites, you do not have to be an HTML or CSS pro. Just arm yourself with your favorite coffee and a little patience, and follow the steps one by one.
We’ll cover how to choose a blogging platform, set up web hosting, get a domain name, choose a blog theme, and everything else you need to get started!
And if you have any questions, leave a comment at the end of the guide. I will answer as soon as possible.
Ready to create your blog? Let's go !
How To Start A Successful Blog?
Reasons You Should Start a Blog
“Fill your paper with the breathings of your heart.” —William Wordsworth
Why create a blog?
What most people think is that you have to be a great writer to start and maintain a blog. It’s not true at all.
There is only one thing necessary to be a successful blogger - Money makes passion more than passion makes money.
There are tons of reasons why you should start a blog. If I start mentioning them all, I should keep writing until sunset. But here are the most common and popular reasons for blogging :
A blog is a web page created and generally run by a single individual, the blogger, who regularly communicates ideas and thoughts on various topics directly on the web. The text is sometimes accompanied by external links and photos, drawings and / or sounds that he wants to share with an ultimate goal of may be generating an online income. Visitors generally have the option of leaving a comment or completing the information.
In fact, it's fun!
Blogging is great and it really has the power to change your life. Simply put, a blog can be your home, your community, your business and today I'm going to show you how to become a successful blogger and make money.
1. Choose Your Blog’s Niche.
Getting the best niche is the most essential element of creating a blog that often gets neglected. You want to win a niche that can also be monetized quickly.
You like the idea of creating a blog. But… you are not sure what to write about. Or maybe you have an idea, but you're not sure if it works. Does that remind you of something?
If you shake your head, you are certainly not alone. Choosing a blog niche is one of the most difficult aspects of blogging. Keep reading, I will help out.
You may have a million niche ideas running around in your head. Or you may have trouble finding just one.
So let's go! Let's see how you can choose the right blog topic for your site.
First, let's make sure we're all on the same page with a simple definition ...
A blog niche is a subject or topic that you will be tackling on your blog. More simply, this is the answer to the question: "What is the subject of your blog?"
Choosing your niche is a crucial step in creating a blog, as it is an important factor that determines the success (or failure) of your blog.
Remember, when you write for everyone. You write to nobody.
What is the best blog topic ?
This is the million-dollar question! If you ask the big blogging gurus, they'll all give you a slightly different answer.
Some say write what you know. Others say you choose a topic you are passionate about, and that way you will never be short of things to say. Or they’ll also advise you to pick a niche at the crossing of experience, passion, and skills.
Both are good advice based on your goals!
If you are blogging for fun, then you should choose a blog niche that you are passionate about. You don't have to be an expert, but you need to have some knowledge of the subject.
However, this system is a little bit imperfect as it’s lacking one important ingredient: monetization.
The passion approach takes ages to make money blogging.
If you really want to make money with blogging, you have to choose a profitable blog topic. This means that your topic should have a large audience, and preferably an audience that is ready and able to spend money on things related to this topic.
I can blog about my passions, experience, and skills for a moment, but if I wasn’t getting any attention or making money, I’d stop 100%.
As I said before, you have to treat your blog as a system, and as a business
Here is my point. Your perfect niche should be based on four fundamental factors:
1. Keyword Research
Keyword research is a center SEO task for blogging. It involves recognizing common words and phrases people enter into search engines. Researching keywords provides bloggers a clear understanding of how high the demand is for certain keywords and content More on this down the post.
2. Professional Leverage
What is my current level of professional experience. What connections do I have in my industry?. Can I leverage this experience into a profitable blog?
3. Audience Income Potential :
you have to know your audience’s obstacles/pains deeply so that you can resolve a pain point that they are ready to pay money on. Example of a target audience :
4. Affiliate Marketing Potential:
Affiliate marketing is the method of promoting the products or services of another seller or business against a commission if the sale is fulfilled.
Imagine you have picked a niche with no affiliate products or service or promote? you are leaving money on the table. choose topics like finance, travel, technology, business, and even marketing.
Here is a graph drafting, on average, how much profit you can expect categorized by niche.
Quick Note
> You like to create content around the subject (Motivation)
> There is enough demand on the market (Demand)
> There are many methods of monetization (Profitability)
How to choose a blog topic
Suppose You Decide To Focus On The “Travel” For Your Blog Niche.
It will be difficult to compete with popular and established blogs if you blog about such a general topic.
That’s why it’s important to choose a narrower topic, such as traveling on a budget or traveling to a certain region.
On the other hand, you don't want to go too far and choose a very narrow topic.
When you choose a niche for your blog, you want to choose a topic that you can write about regularly for years. An extremely narrow niche, like “hydroponic gardening equipment in Nigeria”, is unlikely to work well in the long run.
Why?
Mainly because you will find it difficult to find enough inspiration to write regularly, and you may get tired of writing over and over again.
There just aren't enough readers and buyers in Nigeria for such a narrow subject to turn into a profitable niche for you.
Instead, consider expanding your blog topic a bit. Think of all the different types of gardening you can do, including indoor, outdoor, urban, flower, vegetable, sustainable, and more.
In this larger niche, you can still include whatever hydroponic gardening equipment you want, but you are also expanding into other closely related gardening fields and bringing these readers and customers into your community.
With thousands of posts published every day , choosing the right blog niche is more important than ever.
A more specific blog niche helps you know exactly what to write about and set your readers' expectations.
2. Set Your Blog’s Goals
Establishing goals are one piece of developing a solid foundation for your blog. Clarifying your Mission and Purposes will also support you to improve your blog more efficiently.
If you are serious to be successful in your blogging, treat it as a SYSTEM.
What characterizes excellent blogs from the rest isn’t primarily the perfect quality of their writing or ideas,
But the blogger’s capability to visualize, evoke, and refine them into a feasible vision, with long term plans and strategies. Means, compelling blog goals.
Creating a blog, like any project, will ask you to mobilize resources, set goals, and create a documented strategy!
To precisely define your blog project, you can use the WWWHHW method: What, Who, Where, When, How, How much, and Why?
What? This is to list the actions you want to take in your blog, the niche, and the content you intend to write about.
Who? You must list the people who will be involved in your project and their strengths, Aka target audience.
When? Work a calendar for your actions. It will help you be more productive and assist creating your daily routine.
How? 'Or' What? Identify the means at your disposal, how you will reach your audience.
Why? These are the goals for which you want to create a blog.It’s an opportunity to think big and pin what you need to achieve with your blog both in the short and long terms
It’s an opportunity to think big and pin what you need to achieve with your blog both in the short and long terms.
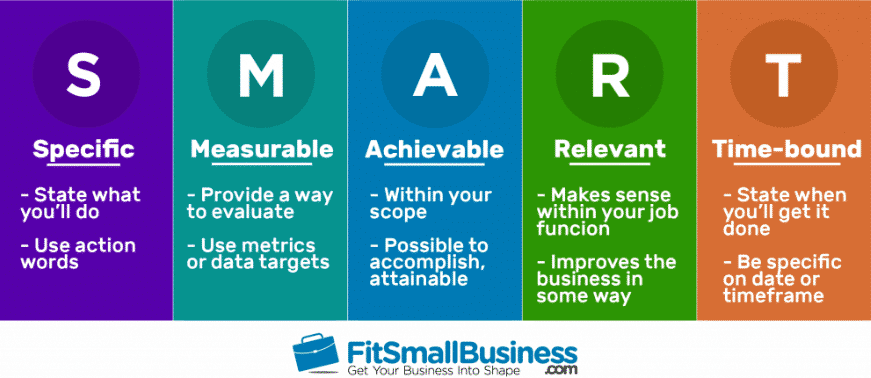
These must be SMART goals – Specific, Measurable, Attainable, Relevant, and Timely-bound.
We tend to generalize our objectives. For instance, a goal could be to ‘increase your sales’. But increase sales by exactly how much and by when? A much more feasible objective can be to ‘Increase sales by 25% by the end of this June’.
So you've chosen a niche, set your goals for your blog - what to do next?
Once you've found the best blog topic idea, it's time to find your ideal platform, domain name and get some powerful web hosting!
We will discuss more in depth setting your content strategy . Stay tuned.
3. Choose The Right Blogging Platform
As a beginner, you’ll need a blogging platform that’s effortless to set up, has no training curve, and doesn’t need any coding . You’ll also want to consider what sort of blog you want to build, now and future.
The next step is to choose the platform for your blog.
There are dozens, but you have probably already heard of WordPress, Tumblr, Wix or Blogger.
Everyone knows "WordPress", the most widely used website editor (CMS) in the world. Over a quarter of websites, or 75 million websites, are "built" on technology by WordPress.
Some WordPress cool stats:
- WordPress is now powering more than 35% of the web
- WordPress enjoys 61.8% market share
- 17 new blog posts pop-up every second
- over 76 million blogs that use WordPress.
Except that there are two WordPress: open-source software (WordPress.org) and the commercial version "turnkey" (WordPress.com).
In their operation, the two "WordPress" are quite different. And in general, when we talk about WordPress, in short, it is the CMS developed by WordPress.org that we are talking about.
A CMS is a computer program that uses a database and allows you to manage the appearance and content of a website from A to Z, without necessarily having any programming coding knowledge. In a CMS, you have access to an administration interface allowing you to update the pages of your site, add sections or functionalities.
WordPress.com:
WordPress.com is a commercial web hosting and creation management system (CMS) owned by Automattic. WordPress.com, in its operation and its economic model is very close to platforms like Wix, Shopify, Jimdo, or Weebly.
Except that WordPress.com uses WordPress open source software - hence its name.
Creating a website on WordPress.com can be done in a few clicks and requires no computer skills. To start, you just need to choose a name for your website and choose a theme from those offered by the platform.
Though, WordPress.com also gives you the possibility of a paid upgrade if you’re looking for more advanced peculiarities.
But, you will have several limitations in terms of running your blog.
WordPress.org
WordPress.org, is also developed by Automattic, is open-source and absolutely free for all to use.
You install WordPress on the host of your choice, choose your domain name, and set up all the features you want. This is the reason why sometimes it is called as self-hosted WordPress.
Having a self-hosted WordPress site enables you to utilize the power of this platform to its fullest.
You will have full freedom in design, layout, options, etc.
While WordPress.org is a little more advanced, it is also amazingly user-friendly and easy to master, whether you’re a novice or a skilled developer
WordPress.com vs WordPress.org
If you're new to WordPress, this is a general question and one that often requires a piece of explanation since the two words are often confusing.
If you are a blogger, and you don’t worry about earning money from your site, then go with the free version WordPress.com.
If you are a company or a blogger that is serious to make money from your site, then we suggest working on the version WordPress.org.
It provides you the autonomy and adaptability to develop your website the style you want.
WordPress.Org
My Verdict :
While the decision is yours! But,
If you are seriously investing in a website project (money and time), then you should just create your website hosted with WordPress.org.
You will get more flexibility at a lower cost (even if you pay a little more for Domain and Hosting).
That’s the CMS that every expert blogger, business owner, and also big name brands like Mercedes-Benz use.
What are other free CMS options?
If you don't want to use WordPress, there are many options to choose from, including free options like Medium, Blogger, Wix, Squarespace, and even starting up on social media sites with fewer options like Quora. , LinkedIn, or Facebook.
However, I have to reiterate, every free blogging platform will have limits.
And if you want to maximize the potential of your blog to earn income, then it is always worth having your own platform and use with a self-hosted WordPress, powered by a hosting provider.
4. Choosing The Domain Name!
Your domain name is the essential component of your website. It can build or destroy you, so it’s important to pick a domain name that serves your business.
The domain name is your online identity. The domain name of this site is emarketinghacks.com.
It is essential to choose the name of your blog properly because it will convey your (brand) image.
Although you would be able to change many things on your blog over time, its name is one of the things you absolutely wouldn't want to have to change.
Take the time to think about a domain that relates to what you want to offer on your site.
Many people simply use their names, while others may have company names to use.
Tips For Selecting A Domain Name
Here are some tips for choosing a domain name for your blog:
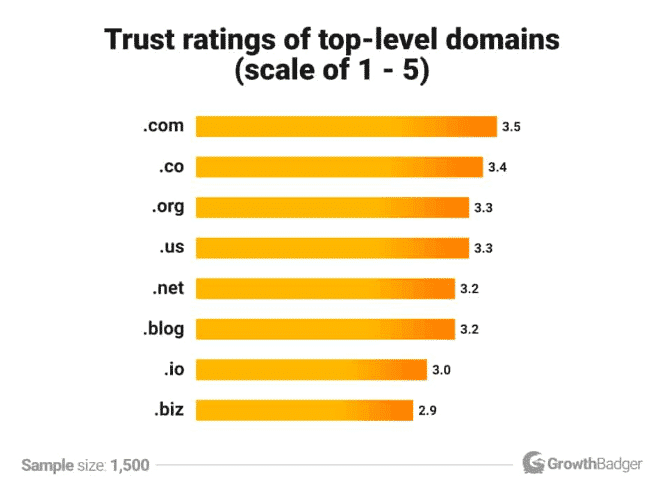
In an experiment, .com extension is the #1 most trusted TLD, with .co in a close next place. The .com also has gained mote trustworthiness, which is very important.
A URL users trust is likely to get more clicked on, shared, and linked to. And it’s more comfortable to create a brand with.
Here’s how the top-level domains proved in terms of observed trustworthiness, on a scale of 1 – 5:
Quick Note: Always have your domain renewed. After registering your domain name, apparently for 12/24 months, you have to renew every year. If it expires, then someone else could get it, and you’d have to start over again! you will suffer and your business is gone.
Related Posts:
5. Do Proper keyword research
Keyword research is the first and most essential element of your SEO strategy.It gives important insight into the queries that your target audiences are searching for on Google.Before you begin writing content for your blog, you will want to recognize proper high-volume search terms.
If you want to make money by blogging, you will also want to do some research to see if there is market demand for your niche.
That means: are people actively looking for what you write about? And can you add value and help them in a way that makes you money?
Being well positioned on Google and search engines can literally change the face of your blog.
Keyword research is the process of finding and choosing the words and phrases that users will be looking for that relate directly to your business, product, or service.
Example. If we wanted to learn how to start a guitar blog, you could choose keywords like "best guitar book", "how to play guitar for beginners", "guitar chords for beginners", "what guitar should I buy ", etc.
Now enter one of these keywords into your Google search. If there are thousands (or more) of results, this is a pretty good indicator of how interested people are in your subject.
Do this for each of your keywords and look at the results. If all of your main keywords have a monthly search volume of between 1,000 and 10,000, you certainly have a potentially profitable niche.

If you stretch it with hundreds of thousands of monthly searches, you may want to be more specific with your niche rather than competing with much larger and established sites on more popular topics.
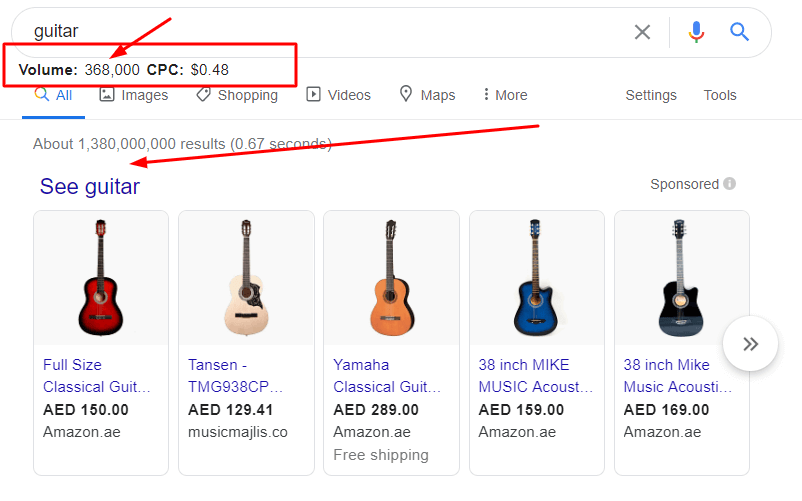
Pro Tip: If you choose the right keyword phrase for a given article and write an engaging and well-written article, your article could rank on page 1 of the SERPS on that phrase.
Let's face it. If you target the wrong keywords, you will completely miss your market.
If in addition, you target competitive keywords, you will never be ranked and therefore read. Remember that user intent changes over time.
If you use the wrong keywords, you will attract the wrong visitors to the website, and no one will buy it.
The good news is :
There are many SEO tools to know all of this search data/information. With tools like SEMRush, Ubersuggest, or Ahrefs, you can easily see unique keyword metrics, including:
Another Free tool I use is Google Keyword Planner
Pro Tip: Identify and target keywords with large volume and low competition to have a far bigger opportunity of ranking.
In this example I'm using Ubersuggest for the keyword : "veggie foods high in protein".
This is the result I got :

If you notice, the keywords difficulty is only 14 and the search is 9,900K per month, which makes it a great option to target and write exceptional content around.
Pro Tip 1: Identify and target keywords with large volume and low competition to have a far bigger opportunity of ranking.
Pro Tip 2: It is far better to rank on page 1 for a phrase that does a few thousand searches a month than to be on page 12 for a phrase that does several hundred thousand searches a month.
Target Long-Tail Keywords
Long-tail keywords or long-tail keywords, these key phrases with low search volume, are real nuggets for your SEO.
The more the users narrow and refine their research queries, the more they are close to conversion
Long-tail keywords are endless sources of targeted traffic.
Definition: Long-tail keywords are very specific search phrases that have a low search volume and are fairly clear about the user’s search intent. Because of their specificity, long-tail keywords are usually made up of three or more words.
Some examples of long-tail keywords:
- Veggie foods high in protein
- Vegan food at Starbucks
- SEO in practice pdf 2025
Why Long-tail keywords are so important:
For three major reasons:
1. Long-tail keywords are an important part of your search traffic. Of all the search traffic on the web, long-tail keywords account for around 70%.
2. It is easy to position yourself on these long-tail keywords. By definition, long-tail terms are terms with low demand and subject to low competition as we said.
3. Because long-tail keywords are so specific, their conversion potential is high.
Whatever your micro-conversion, smart long-tail keyword research can help you target terms that are geared towards that goal.
Look for new long-tail keywords
It is very likely that you already have a list of basic keywords. That is, the most generic term that you target with your site. However, it's a good idea to search for new long-tail keywords based on this basic list.
Example.
If my niche is Veggie food, I would flag the focus keyword (Veggie food) in the ubersuggest search box, and see the related long keywords geerated :

As you can see I have generated a lot of keywords with more than 2 words each and I have also noticed that they have a decent amont of traffic.
Another way to do it is by using Google "Autocomplete" or ''Autosuggest'' and "related searches" functions.
let's use the same focus keyword :

Using related keywords in google :
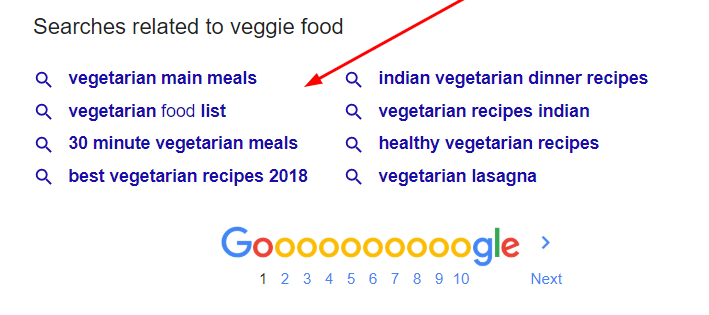
Semrush is also great in this.
STEP 1: Open SEMRush's Keyword Magic Tool then enter your target keyword and click on the search button.
Suppose, I want easy to rank keywords related to "SEO". So, I've entered SEO here.

STEP 2: As you can see in the below screenshot that this tool is showing more than 271,562 keywords related to SEO (US ONLY).

But We want only easy to rank keywords.
STEP 3: What you have to do is click on the "Advanced Filter" option which is showing above the result.

After applying the above filter now this tool is showing 350+ long-tail easy to rank keywords which have 100+ search volume and have less or KD.
So, in this way, you can find easy to rank long-tail keywords with the help of SEMRush tool.
7 Days Free Trial of SEMRush. Click on the below link to grab it.
Activate SEMRush 7-days FREE Trial
Don't miss this golden opportunity.
These are great ways to find the long-tail keywords you're looking for.
You can also check pay-per-click statistics (if you do), social media sites, and even popular YouTube videos specific to your niche.
There are tons of long-tail terms everywhere. And they are super effective in improving traffic to your site.
Hopefully, this will help you gain a lot of targeted visitors to your site. As you optimize your pages for the newly found long-tail keywords, be sure to regularly measure your rankings and traffic for these terms.
- insert it into your meta description.
- Add the main keyword through your paragraph body. A good practice is to use a 1% keyword density but don't stuff keyword .
- Add the keyword in your headings.
- Add as many LSI keywords as possible
- insert the main keyword to the first paragraph ( be clear from the start )
- Add the focus keyword in the title of your blog post.
- Place the focus keyword in your permanent URL.
6. How to choose your host?
Selecting a reliable Webhosting provider constitute to : security, speed, and support . For great measure, scale may be supplemented to the ingredients .
There are tons of online hosting services. But only a handful of them are good, reliable, and inexpensive.
For bloggers choosing a host is like searching for Mr. Right, which is a a familiar dilemma.
So how to choose one?
In fact, when it comes to choosing a web host, there are 4 main criteria to take into account:
Performance - Speed and Up time : After you’ve invested your time and money into designing a great website, you should avoid annoying your audience with slow load time.
Look out for a web hosting that has features that make your site load fast and guarantee 99.9% up time.
Customer Support: No matter how reliable your hosting company, there will inevitably come a time when something will go wrong , or you’ll need to ask for assistance.
So, ensure you have a great customer service team waiting to help you answer your queries.
Security & backup: A web hosting with great security strength is for sure what you want, especially if you’re planning on getting your customers information via your website like Offering a SSL .
Scalability: With your business and brand awareness growth, traffic to your blog also increases.
With such a rise, you need web hosting with easy scalability to make sure it will be able to withstand the increase.
Taking into account these 4 criteria, the host I recommend is Hostinger.
They’re offering a FREE Domain Nameon their web hosting plans.
They’re extremely affordable, have the resources you need to run a great blog or website , and a support team to assist you when you run into any problems.
Saying this, here’s what’s so great about Hostinger, based on experience.
Note: These features collectively position Hostinger as a reliable, high-value hosting provider that caters to a diverse range of users, from beginners to developers.
7. how to create a wordpress blog using Hostinger
Congratulations! WordPress is an great CMS for how to start a blog. In this section, my plan is , in an easy style, to walk you through the method to start a wordpress blog using Hostinger.
We are now entering the meat. At the end of this step, you will have a functional WordPress blog, on your domain name.
Let's go !
Note: I will show you the following steps at Hostinger. The process is simple and smooth.
If you want to use another host , make sure that this host offers easy installation of WordPress in one click.
If this is not the case, you will have to do it manually. This can be a bit complex and should be avoided for beginners.
If you choose Hostinger follow these steps :
Click here to –> go to Hostinger (The link will open in a new window so you can reference these instructions as you work.) :
1. Get Started
Visit Hostinger and select a hosting plan. Beginners can start with the Single Web Hosting plan, while the Premium Shared Hosting is ideal for multiple sites. Pick a domain name (free with some plans) that suits your blog's niche.

Complete the Purchase : Sign up with your email, select a billing cycle, and complete the payment using your preferred method.
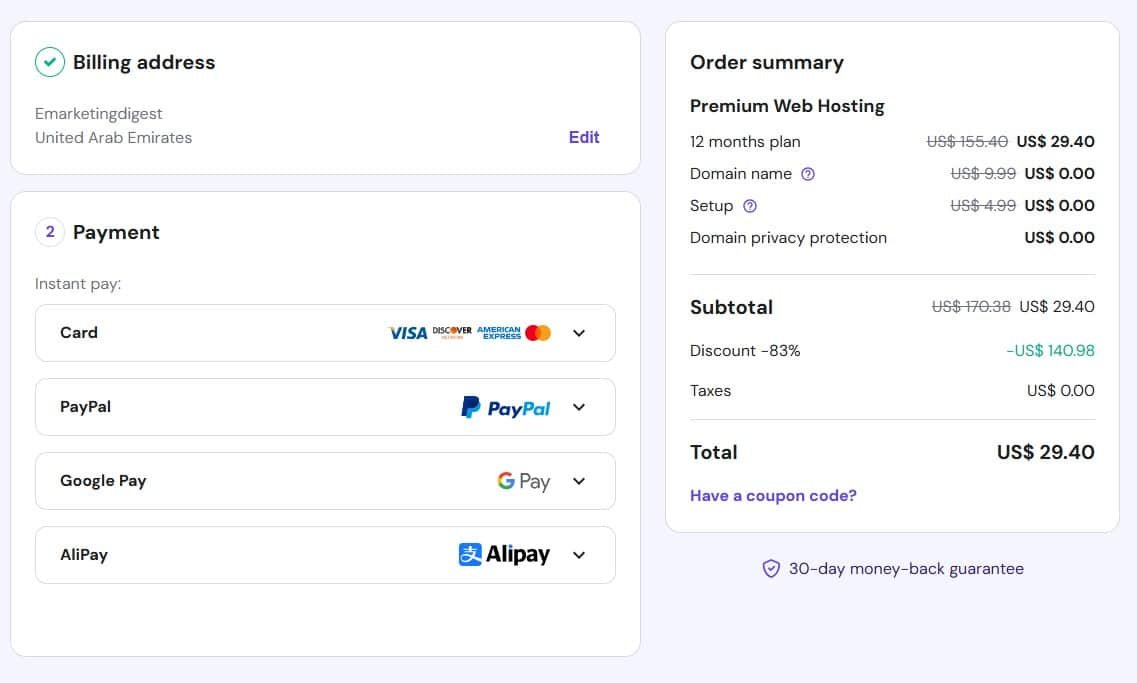
Hostinger is a web hosting provider that stands out for its simplicity and speed. Unlike some platforms that rely on traditional cPanel interfaces, Hostinger uses its own custom hPanel, designed to streamline website management without overwhelming users.
For beginners, this modern dashboard simplifies tasks like domain setup, email management, and WordPress installation. While it may feel different for those accustomed to cPanel, the intuitive design ensures you quickly adapt.
Hostinger’s hPanel isn’t just user-friendly—it’s feature-packed, offering tools like one-click installers, DNS zone management, and resource monitoring, all within an elegant, clutter-free interface.
2. How to Install WordPress Using hPanel’s WordPress
Hostinger makes setting up a WordPress website easy and beginner-friendly, especially for those using Business or Cloud hosting plans. With built-in AI tools for content creation, you can quickly launch your website without technical hassle. Here's a step-by-step guide to installing WordPress via hPanel's onboarding flow.
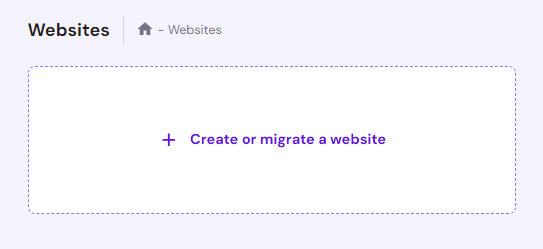
Tip: If you already have a website, the migration option lets you transfer it seamlessly.
- Specify the type of website you want to create (e.g., blog, business, portfolio) :
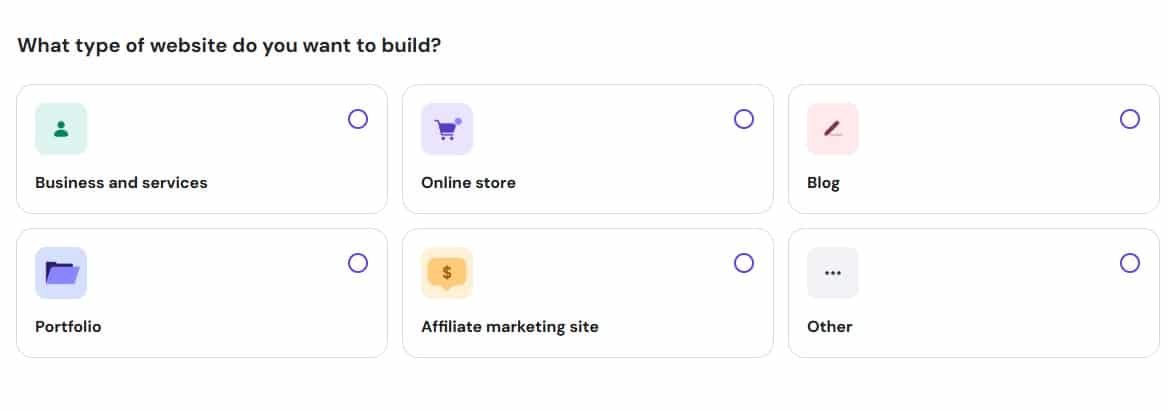
Select Create a New Website and choose WordPress as your platform.
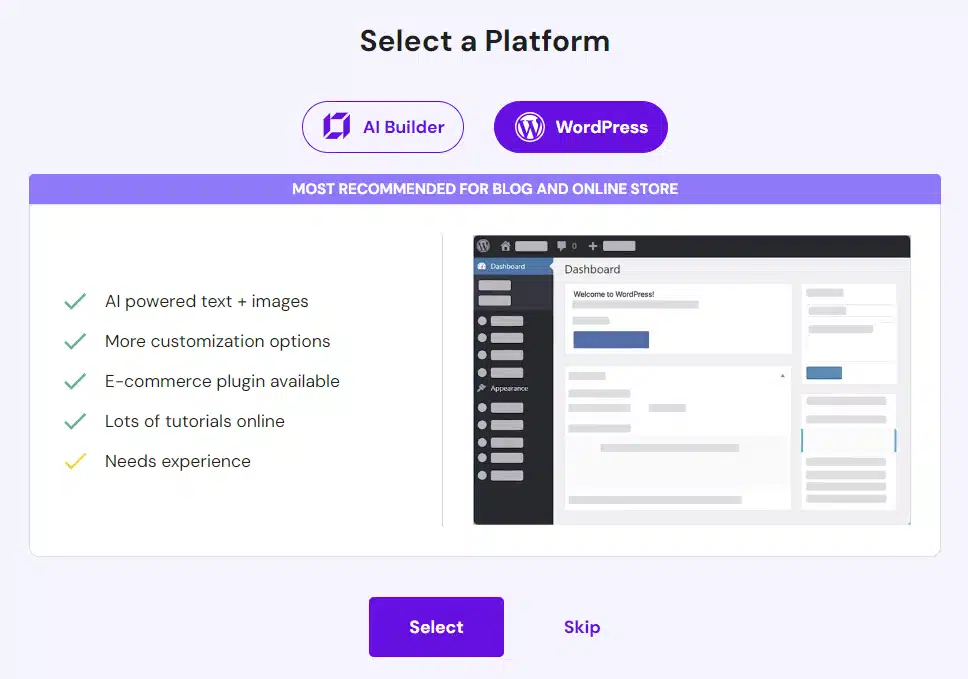
Pick your preferred language for WordPress. Enter a username, email, and strong password for your WordPress admin account. Your WordPress login doesn’t need to match your hosting credentials. Click Continue to proceed.
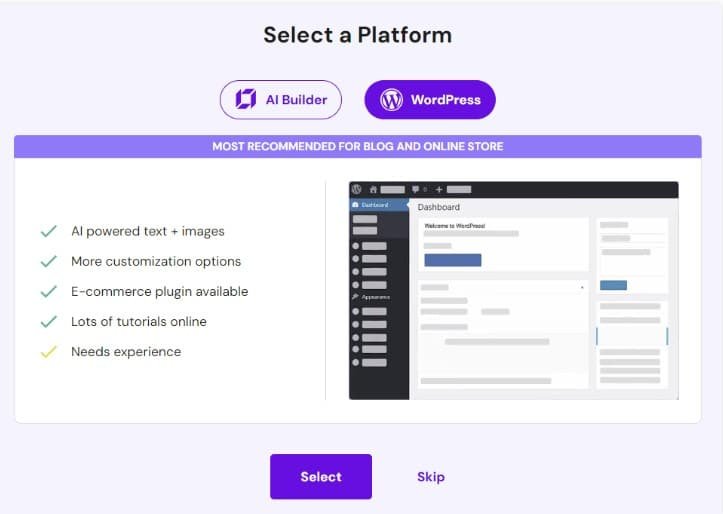
Hostinger’s WordPress onboarding flow simplifies the website creation process, making it perfect for beginners and users short on time. With its intuitive interface and AI-powered tools, you’ll have a fully functional website in no time.
3. Add you Domain
If your domain isn’t already connected to a site:
- Go to the Websites section in hPanel and select Add Website.
- Follow the onboarding steps to connect your domain.
- Once propagation is complete, manage your domain records using the DNS Zone Editor.
For additional guidance, refer to the video tutorial provided.
4. Add SSL Certificate
SSL (Secure Sockets Layer) is essential for protecting sensitive data during online activities like browsing, form submissions, and transactions. Beyond safeguarding information, SSL boosts your website’s search engine rankings and improves visibility.
Hostinger automatically sets up free SSL certificates when you add your domain to a hosting plan.
Manual Installation : In hPanel, verify your domain, navigate to Security → SSL, and select your domain. Click Install SSL to activate encryption. Confirm the SSL is active by looking for the lock icon in the browser or using an SSL checker.

Acquiring SSL Certificates
- Free Certificates: Offered by providers like Let’s Encrypt for basic security.
- Paid Certificates: Purchase from trusted Certificate Authorities (e.g., DigiCert, Comodo) for enhanced features like Wildcard SSL.
Paid SSL Installation Process : Generate a Certificate Signing Request (CSR), verify domain ownership through DNS or email, and submit the CSR to your chosen CA. Finally, install the certificate via hPanel.
Unlock the Power of Web Hosting
30-day money-back guarantee means it's risk-free.
Quick Notes
I Picked Hostinger for its affordability, speed, and ease of use. It offers a beginner-friendly hPanel, free SSL certificates, and built-in WordPress tools like LiteSpeed Cache for faster performance and AI-powered plugins for quick content creation. Its plans also include a 99.9% uptime guarantee, free domain registration, and seamless scalability, making it a top choice for both beginners and professionals.
The 3 best alternative Webhosting companies worth Checking :
A2 Hosting: A2 Hosting has earned a solid reputation for providing reliable and high-performance web hosting solutions. They offer a range of plans to suit various needs, from shared hosting for personal websites to VPS and dedicated servers for businesses.
Key Features:
- Speed: A2 Hosting utilizes Turbo Server technology, promising faster loading times and improved website performance.
- Uptime: They maintain a strong track record of high uptime, ensuring your website is accessible to visitors.
- Support: Their customer support team is known for being responsive and helpful, available 24/7.
- Security: A2 Hosting implements robust security measures to protect your website from potential threats.
Pricing:
A2 Hosting offers competitive pricing, with plans starting at affordable rates. You can find shared hosting plans for as low as $3.92 per month. However, it's important to note that these introductory prices are often for limited periods, and renewal rates may be higher. A2 Hosting Review
BlueHost has been a pilot in the shared hosting market since 1996. Over 300,000 sites are hosted by BlueHost and its technical support is known as one of the most effective on the market.
BlueHost hosting provides a very wide range of benefits. For less than the US $ 8 per month, hosting includes unlimited disk space and traffic, as well as a free domain (with the free private registration option!)
And the ability to host an unlimited quantity of sites with just 1 account! Of course, like most of the US web hosts selected here, BlueHost also offers a 30-day money-back guarantee.
In addition, BlueHost's strong point is its 24-hour technical support (very important ) and availability via phone, email, or online chat, with a response time of fewer than 2 minutes! Starting at $2.95/mo*
DreamHost : I am a Dreamhost user since 2019 and always had adequate and rapid support. with Unlimited space & traffic, Free domain + hosts an unlimited number of domains, 24/7 technical assistance + 100% uptime guaranteed.
DreamHost is an award-winning company, and one of the oldest hosting companies on the market, so they are real pros when it comes to providing you with quality web hosting with loads of benefits, features, and capabilities:
Free Automated WordPress Migrations, Unlimited space & traffic, Free domain + hosts an unlimited number of domains, 24/7 technical assistance + 99.9% uptime guaranteed. Starting At $3.95/Mo.
A very reassuring 97-day money-back guarantee in case the service does not meet your expectations.
If you still need to decide more of the best blog Webhosting companies, then check my analysis of the best web hosting providers this year.
3. Access your WordPress dashboard
To access your WordPress dashboard on Hostinger, you can either use the direct link provided in hPanel or manually enter the login URL.
Here you enter the username and password you chose when installing WordPress.

4. Configure And Set Up Your Blog
In this ection, I will now explain some basics of WordPress to help you in your first steps.
We will see :
The administration interface of your blog
When you log on to the administration interface of your blog, you will find yourself on a screen that looks like this (from one of my sites):

Now, let's take a look at the main elements of the interface, and the menu on the left, which every new WordPress user must know:
The dashboard: It gives you various information about your activity, including the number of articles, pages and comments you have.
You can also start writing an article ("quick draft"), but we'll see in a moment a better way to do it. You will also find a feed with news around WordPress ("WordPress News").
Your dashboard can be enriched as and when information from other plugins, for example the display statistics of your blog visit.
Posts: This part allows you to create a new article on your blog, or to access existing articles to modify them. You can also manage categories/ tags. The categories allow you to organize your articles according to topics.
Media: This tab allows you to access your media library and add items to it. Thus, this media library includes all the media elements (images, videos, audio files, pdf files etc.) that you have added as you go along your site
Pages: This part allows you to create a new page, as well as edit the existing pages on your blog.
A page in WordPress is typically static content (which will change little over time) and differs from an article.
Comments: This tab allows you to administer comments. You will find comments pending validation, comments validated, etc. If you want to delete a comment, this is where it also happens.
Appearance: This is where you can change the appearance of your blog, by installing new themes and configuring them.
We will talk about it in more detail later. This is also where you can edit your menus, as well as your widgets (the items that appear in the sidebar of your blog).
Plugins: To install a new plugin (extension), this is where it happens! Installing plugins allows you to easily add new features to your site.
Settings: This tab allows you to change various settings of your blog, including its title, but also change the email address of the administrator, as well as other important settings for your site.

How To Make Your Blog Better Optimized For Search Engines And Your Visitors
By default, your URLs (the web addresses of the pages and articles of your blog) are displayed in quite a terrible form 🙂 (like http://www. yourdomainname. com /?p=123),
which is neither understandable for your visitors, nor optimized for search engines.
To remedy this, I advise you to make the following change.
Go to your WordPress dashboard , then click on "Settings" in the left menu, then "Permalinks". Then select "Post Name", before confirming your changes by clicking "Save Changes".
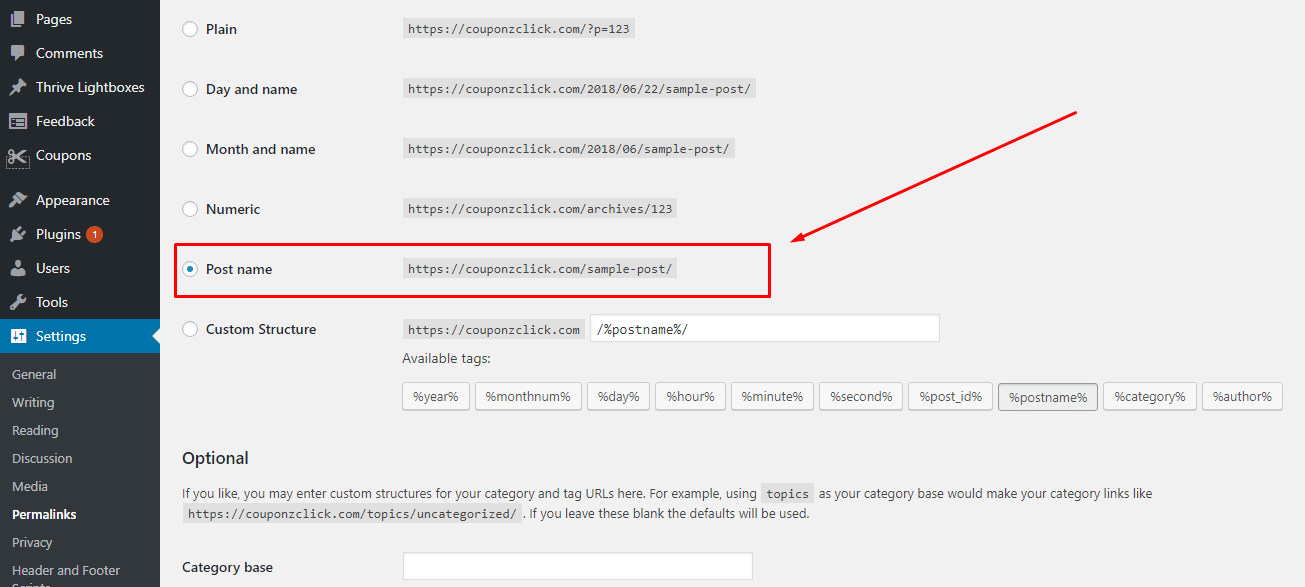
From now on, the name of the article or the page will be used for the links of your blog, which will be much more comprehensible for your visitors and advantageous for the SEO of your blog!
How to change the appearance of your blog ( WordPress Theme )

WordPress uses so-called themes to determine the design and appearance of a site. To change the appearance of your blog, the easiest way is to change the theme.
Selecting the appropriate WordPress theme for your Website is one of the most critical decisions you’ll have to take.
But,
Picking a WordPress theme can also be overwhelming, there are actually thousands of paid and free choices ready to download and buy.
Your theme is the overall appearance, feel, and fashion of your site.
To support you choose a great website WordPress theme for your special custom needs, ensure to take into consideration these criteria :
Most premium themes provide great support and updates. Here are some of the WordPress themes providers that we extremely suggest.
Currently I'm using Generatepress for this site, and I wrote a detaild Generatepress review around it. Other my blogs I use Kadence Themes.
Quick Note
It is not enough that your theme is beautiful. Because branding and reputation is more than just your favorite color. Your site should be like the goal you want to take it to. It must accompany the message that you want to convey to your target audience. Ask yourself these questions:
How to install a free WordPress theme
Installing a free WordPress theme is very simple.
Go to your WordPress interface, and click on "Appearance" in the menu on the left, then on "Themes". Then click on "Add" at the top of your screen.

You will arrive on a screen presenting you with various free WordPress themes available.
Using the filters, you can browse the different themes available (there are several hundred).

The filter feature is very useful, it allows you to filter the themes by layout and topic (Blog, E-commerce, Photography, Holidays, etc.).
Tip : Do not choose a theme that is not responsive!
Unresponsive websites normally damage the way your site looks on devices like mobile, and tablet, Hence negatively affecting your SEO, Ranking, and Revenue.
If you like the theme, click on it. You will then be able to generate a preview , to see it in action, click Install.

Once the theme is installed on your blog, you will have the opportunity to perform a live preview.
This means that the theme will be applied to your blog for a preview, and you will see it in action with the content of your blog.
To use the theme on your blog, all you have to do is press Activate.

How to install a paid WordPress theme (premium)
To install a premium theme that you have previously purchased from Elegant Themes or MyThemeShop, the procedure is slightly different.
First, make sure you have the theme files, which you can download after your purchase. This is an archive in .zip format.
Then, go to your WordPress interface, and click on "Appearance" in the left menu, then on "Themes". Then click on "Add" at the top of your screen and then upload theme.
Then, click on "Choose File" to select the theme .zip file you bought, and click on "Install Now" :

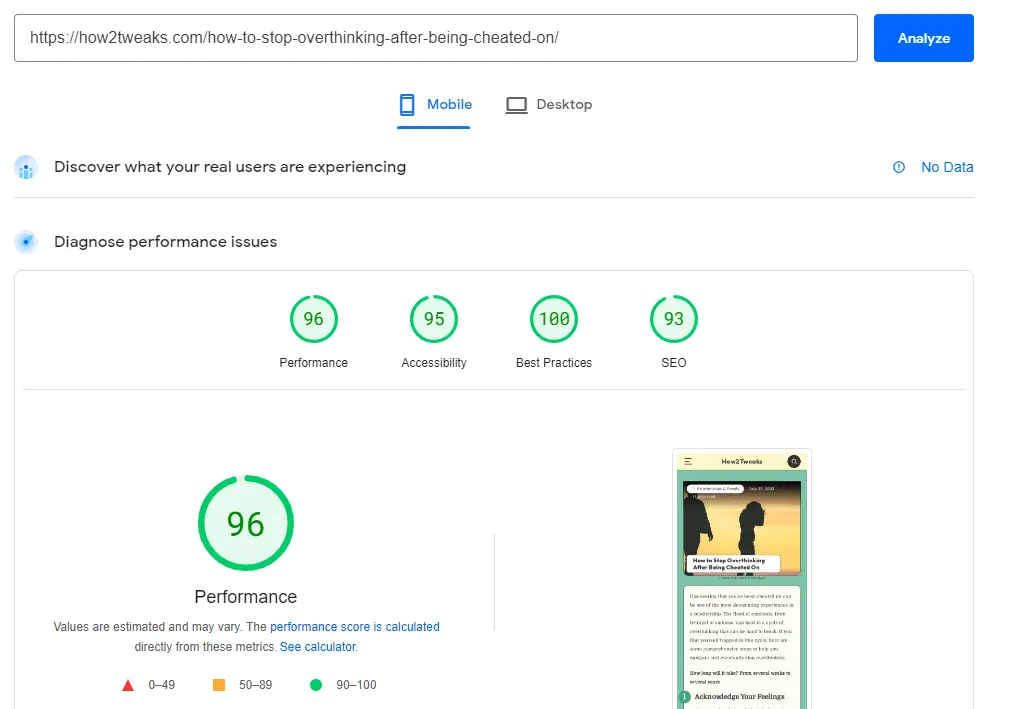
Once you've installed your premium theme, it's crucial to consider the impact of your theme on your website's speed. Page speed is a significant factor in user experience and SEO. A slow website can lead to higher bounce rates, which can negatively affect your site's ranking in search engine results.
For instance, take a look at how this how-to blog optimized their theme. It consistently scores 95+ on page speed tests, thanks to a well-optimized theme. It's a great example of how a well-chosen and properly installed premium theme can lead to impressive page speed performance.
How To Add Plugins To Your Blog
You will realize that your theme is not doing everything you want. Plugins allow you to add new functionality to your site. You can, therefore, consider them as extensions of your site.
This can be adding contact forms, sharing a bar on social networks, or helping you optimize the SEO of your blog.
And in the plugins department, there is a plethora of choices! Most are free, some are paid. And I will try to demystify all of this by presenting you with those that I think are essential,briefly.
Most of the plugins I use on my sites and blogs are free. However, there are some plugins for which I think it's really worth to invest a few tens of dollars.
Here are my favorites, which I install on all my sites and blogs:
Thrive Leads: a must-have plugin to boost conversions on your blog .Thanks to Thrive leads, you will be able to collect emails from your readers in order to send them newsletters. It’s a tool of choice for marketing people. The tool can be integrated with famous email marketing services like Mailchimp.
Thrive Architect: Plugin also essential for formatting your pages and articles according to your every wish.
Yoast SEO is a must. This plugin will help you optimize your site and the writing of your articles by giving you improvement guidelines so that Google will index you better. The free version is sufficient. I also recommend Rank Math. I curated a list of the 22 best WordPress SEO Plugins.
WP Rocket is the plugin you need to optimize the loading speed of your site. It caches your site, optimizes your CSS, JS, images, and your database. In a few clicks, your site will become ultra-efficient!.
GDPR Cookie Consent: The GDPR Cookie Consent plugin will help you make your site GDPR compliant. It arrives with a multitude of features. The plugin will allow a notice with Accept and Reject choices.
Woocommerce: Basically, WordPress is not designed to create an e-commerce site, this platform is especially suitable for blogs and news sites. Thanks to the Woocommerce plugin , you can create your online store directly from WordPress very easily.
Insert Headers and Footers: Without editing or touching your theme files/ code! Insert Headers and Footers is an easy plugin that allows you to insert codes like Google Analytics, custom CSS, Facebook Pixel...etc. to your WordPress website's header and footer.
More on WordPress Plugins, I have written this post just to highlight the best ones in the market.
Now let's see how to install a new plugin.
Limited discount - try hostinger!
How to install a free WordPress plugin
Go to your WordPress dashboard , and click on "Plugins" and then "Add".
You will arrive on a screen quite similar to that of the themes, which allow you to browse the various free plugins available, do a search by keyword, get more information about a plugin and go on.

When you find the plugin you need, click on "Install".
The plugin will be automatically downloaded to your blog, and you can activate it by clicking on "Activate".

How to install a premium WordPress plugin
To install a premium WordPress plugin, the procedure is quite similar to installing a paid theme that we have seen before.
First, make sure you have downloaded the files of the premium plugin you just bought. This is in .zip format.
Then, go to the dashboard , then click on "Plugins" then "Add" and then "choose file". You will then have to select the .zip file of the plugin, then install it on your blog, last you need to activate it.
That's it, your premium plugin is installed and active on your blog!

Check here for the 34 Must Have WordPress Plugins (Free And Paid), you may need to boost your website.
Write and publish articles with WordPress
In this last part, I will show you how you can write your first article. We will also see how to add images, how to add links and how to format.
How to write a new article in WordPress
To add a new article, first go to your dashboard , then click on "Posts" and then "Add" in the left menu.
You will arrive on a page allowing you to write your new article.
You can add the title of your article in the top field, and the text of your article is to be written using the WordPress editor.

When you write an article, you can save your draft by clicking on the button provided for this purpose in the box at the top right.
You can also preview your article by clicking on "Preview".
When you have finished writing your article and want to add it to your blog,
simply click on the "Publish" button. If you wish, you have the option to schedule the publication of your article at a later date.

Once your article is saved (or published), you can find it, as well as all other articles you have on your blog, by clicking on "All posts" in the left menu.
To make your items more attractive, and how to write a successful blog post several options are available.
Let's go through some of them :
Add images
To add an image to your article, click on the "Add Media" button.

Tip: Before you click "Add Media", be sure to put your mouse cursor in the right place in the text (where you want to add the image).
Otherwise, you will have the option to move it.
Click "Upload files" and then "Select files". Then select the image on your hard disk, and download it on your blog. The image will be added to your media library.

When the image is uploaded to your blog, be sure to select the image, and click "Insert into post" to add it to the article you are writing.

Add links
To add a links,select the part of the text where you want the link to appear, and then click the chain link icon in the toolbar.

If you want the link to open in a new tab (this is the option usually chosen for links within an article), you first need to click on the small icon resembling a gear to access the link options.
You can then check "Open the link in a new tab", then click on "Add a link" to finalize the addition of the link.

How to format your texts
WordPress offers you several tools to format your texts. If you're used to using a text editor like Microsoft Word or Google Docs, you will not be left out.
First, click on the icon below to display all the options on the toolbar.

Then you will see that you can put your text in bold, italic, the bar. You can add bulleted lists, numbered lists.
You can align your text to the left, center it, align it to the right. You can change the color of your text, underline it etc.
In short, you have a multitude of possibilities and I invite you to try them all!
The default text for your article will be paragraph type.
However, to better structure your article, you will probably want to add titles and subtitles to the different parts of your article.
This is done by selecting the text to transform into a title, then clicking on "Title 2" or "Title 3" etc.
To optimize your SEO, I recommend using "Title 1" only for the title of the article.
Then use Title 2 for the subtitles of your article (the titles of the major parts of your article). If you still want to divide the different parts of your article, then you can use "Title 3" and so on, as you can see in the example below.

Thrive Architect is the content editor we use here at eMarketing Hacks and on the majority of our sites. We love it and find it superior to other alternatives but it's not perfect.
The idea is to let you build your pages as quick as possible using the drag-and-drop editor so that you don’t spend endless hours fiddling around with shortcodes, CSS and HTML, Etc.
8.Write quality content for your blog
Writing excellent content is a decision. You can put in the effort needed to produce exceptional content and create a flourishing business. Or take the simple route and write sick content that will get you to nowhere
By quality content, we must understand two things: your content must add value to your target and it must be optimized for the web.
There is no secret: to attract people to your blog, you have to offer worthwhile content. To do this, you must ensure that the content you offer meets at least one of these vocations:
Before posting an article on your blog or any other content, ask yourself what it brings to your target audience. If the answer is "nothing", abstain.
Providing interesting content is great, but if no one sees it, it's not very useful.
It is therefore important that your content is optimized for the web to be well-positioned in the search engines.
Here, everything is played around strategic keywords: I suggest you take note of proper keywords research before you embark on writing. There are several keywords tools to help out there including Semrush.
If you want to stand out and create a successful blog, you are going to have to do a little more and offer a diversified, repurposed content.
For this, you can offer different types of “premium” content:
- Infographics,
- Videos,
- White papers,
- Webinars and more
By offering this content on your blog, you will attract qualified traffic and satisfy a wide range of your target audience's tastes, I mean How they like to consume content
Indeed, here it is win-win on how to become a blogger: your visitors get content with high added value and in return fill out a form.
This practice is very common and will allow you to regularly send newsletters to retain your readers and boost the audience of your blog ( email marketing ).
9. Develop Your Content Strategy
It’s no wonder that those bloggers who DO hold a content plan are to believe that their content marketing endeavors are paying off. with no strategy, success or failure is just a matter of chance.
Why creating a content strategy?
Creating a “content strategy” can seem like a difficult, tedious process that requires a degree in content engineering and expensive PC.
But that’s really not the case.
A strategy is literally just a workable action plan for everything you've already planned.
If you know your niche and understand your goals
If you know your ideal reader and what they are looking for ...
If you know the value you want to provide them and your unique perspective ...
Then creating a content strategy is as easy as solving your readers' most important issues.
Best of all, having a content strategy will help you when you feel demotivated, when you don't know what to write or when you are thinking about giving up your blog.
Here's how to set up a basic blog content strategy:
1. Set your goal for your blog.
as we discussed earlier, setting a content objective is a must!
What do you want to accomplish with your blog content? Is it to drive traffic and get readers?
To get users to sign up for your newsletter? Ask them to download an ebook you drafted or something else?
This objective may change when you begin, but it's regularly necessary to know it early.
You have the freedom to make these decisions at the start when they are free, quick, and easy. No later than when you made promises. "
Once you know your principal goal, we can start to set the mini wins that will assist you to get there and how to become a blogger!
2. Know your audience
Your users/readers determine whether your blog is a success or not. And to write to them, you really have to get them.
That’s why it’s helpful that you also write for yourself. This guarantees at least an audience of one.
I strongly believe that the audience for which you write your blog articles is just as valuable as what you write.
In many cases, you will become your ideal reader, which makes this whole process more manageable. But in almost all cases, it's worth doing some research on the audience you're writing for.
To start, you want to think about the demographics and psychographics of your ideal audience:
Demographics: Quantitative characteristics of your readers. Think, age, gender, location, job, etc.
Psychography: The most "immeasurable" traits such as values, interests, attitudes, and belief systems.
Once you have written these qualities, you can begin to create your persona.
So you can say that you are starting a cooking blog for people aged 30 to 40, stay-at-home moms living in the USA, who value organic ingredients and are not too worried about the costs of food.
Now the next question is this: where are these people online?
Are they looking for recipes on Google or Pinterest?
Are they active Facebook users or do they prefer niche community sites and forums?
Do they comment on other cooking sites or consume content just to see?
The purpose of your blog is to create value for these people.
Here is an example you can follow :
3. Build your editorial line:
Maintaining an organized blog content strategy is an easy task and can seem to be discouraging.
however, there are many tools that will assist stay motivated, save time, and get everything organized. Among the ones we use :
- Google Docs (free)
- Usepanda.com to find trending posts
- Google calendar
- CoSchedule's Headline Analyzer: to create catching headlines
- BuzzSumo: get a glance at how competitors are creating their content
- Grammarly ( Freemium )
- Feedly RSS feed is an excellent method to maintain track of popular topics in your niche and obtain content ideas.
I like to use google docs to outline and trace my work
I include things that I see important to me like :
most bloggers use a combination of these tools. This will make it easy for them to save time and stay more productive
spending some time planning your content and blog posts. this will allow tracing every progress from brainstorming ideas to editing, to publishing and to promoting
4. Diversify your channels
To acquire traffic via this web marketing lever, you will have to think about multichannel.
Focusing on SEO is a long process and takes time, so and you need to reach your targets quickly and efficiently ( don't get me wrong here, SEO is important )
This is why the distribution of your articles must be done via many other digital marketing levers. So remember to highlight your articles via different means of communication:
- On social networks where your targets are located.
- Via emailing. Far from being dead, this digital tool is a very good way to make your articles read to your existing contacts and to arouse their interest vis-à-vis your company. Cold email outreach for your blog can amplify your content to the right audience, driving engagement, awareness, and leads. Make sure to Keep your emails concise and focused on value
- On relevant high-quality forums Like Quora
- Facebook group and more
10. AI in Blogging: Strategies for Efficiency, Creativity, and Impact
Harness the cutting-edge potential of AI to revolutionize your blogging game. Forget writer's block, tedious SEO optimization, and repetitive tasks. Embrace AI as your secret weapon to skyrocket your blog's success
AI presents a potent ally for bloggers, offering avenues to streamline workflows, foster creativity, and enhance content quality. Below are several strategies to leverage AI effectively in your blogging endeavors:
Content Creation:
- Idea Generation: Overcome writer's block by harnessing AI to propose blog post topics, titles, and outlines tailored to your niche and audience. Platforms such as Rytr and Jasper specialize in this assistance.
Drafting and Writing: Employ AI writing assistants to produce initial drafts of blog posts, introductions, conclusions, or specific segments. These serve as valuable starting points, saving time and injecting fresh perspectives. Noteworthy examples include Articoolo and Writesonic.
Research and Data Analysis: Capitalize on AI-powered tools to gather pertinent data and statistics for your blog content, enriching credibility and depth. Consider utilizing resources like Lexalytics and MeaningCloud for this purpose.
1. Jasper: Generates various content formats like blog posts, headlines, product descriptions, and social media captions. Offers integrations with Grammarly and Chrome.
2. Copy.ai: Provides a user-friendly interface for generating different content types, including blog intros, outlines, and product descriptions.
3. Writesonic: Creates long-form content, blog posts, landing pages, and marketing copy with various templates and features.
4. Frase: Focuses on SEO-optimized content creation, offering topic research, outline generation, and content writing assistance.
Content Optimization:
SEO Recommendations: Receive AI-driven guidance on optimizing your blog posts for search engines, encompassing keyword placement, meta descriptions, and header structuring. Tools like Surfer SEO and MarketMuse excel in this domain.
Grammar and Plagiarism Checking: Ensure your writing is polished and devoid of errors through AI-powered grammar checkers and plagiarism detectors such as Grammarly and ProWritingAid.
1. Surfer SEO: Analyzes existing content and suggests improvements based on SEO best practices and competitor analysis.
2. MarketMuse: Offers content planning tools that suggest topics, analyze content gaps, and optimize content for search engines.
3. AI Writer: Generates blog post ideas, outlines, and titles based on keywords and audience interests.
Engagement and Outreach:
- Personalized Recommendations: Harness AI to tailor your blog content and suggestions to individual readers based on their preferences and browsing history. This personalized approach fosters increased engagement and reader loyalty. Explore tools like Outbrain and Taboola for this functionality.
Community Management: Utilize AI chatbots to handle common queries and moderate comments on your blog, freeing up your time for other essential tasks. Drift and ManyChat are prominent options offering this capability.
1. Yext: Manages your online presence across various platforms, ensuring consistent information and personalized experiences for your audience
2. Amplify.ai: Analyzes customer data and predicts their preferences, allowing for personalized recommendations and targeted outreach.
3. Conversica: Uses AI-powered chatbots to automate personalized email outreach and nurture leads.
Key Considerations:
- AI as a Tool, Not a Replacement: Remember that AI serves as a tool, not a substitute for human input. Always review and fact-check AI-generated content to ensure it aligns with your voice, style, and brand.
- Emphasize Quality and Originality: While AI expedites content creation, prioritize maintaining quality and originality to distinguish your work in a competitive landscape.
Ethical Awareness: Stay mindful of the ethical implications associated with using AI-generated content. Always disclose the use of AI and refrain from producing content that may mislead or harm audiences.
By deploying AI strategically and ethically, you can elevate the efficiency, creativity, and impact of your blogging endeavors.
11. Measure and Analyze all the statistics
Whether your blog is big or small, obtaining a aggressive advantage starts with measuring your audience’ activity and interpreting the results, so you can apply the insight to enhance your blogging strategy.
If you follow the above steps with consistency and commitment, there is no doubt that you will significantly develop your blog’s audience over the months.
However, to optimize your actions and make sure you're on the right track, be sure to analyze all the statistics you can get around your blog.
For this, I highly recommend using Google Analytics: with Google Analytics, you will be able to know the number of visitors to your blog, their geographic origin, their interests but also the behavior they have on your blog.

This will allow you to analyze the average number of pages they visit on your blog, which blog articles are read the most, in short, what works and what doesn't.
With Google Analytics, you will be able to refine your strategy in real-time to make your blog an essential part of your life activity.
Monitor your KPIs
This is the crux of the war in any digital marketing strategy: metrics must guide every action you use.
And blogging is no exemption to this golden rule.
Follow the impact that blogging has on your marketing and commercial efficiency by measuring frequently and in real-time:
- The quantity of visits generated on your site thanks to your articles.
- The bounce rate shown on your articles, the number of visitors who will not click on another link on the page they have visited.
- The conversion rate on each of your published posts.
Each of these KPIs can be segmented according to distribution channels (Social Media, SEO, advertising, etc.), and give you shots to further enhance your blogging strategy over time.
Do you find that your blog posts don't convert much?
Review the layout of your call-to-action on your blog.
Are you facing a record bounce rate?
Ultimately, these 5 keys to making blogging, a real lever of success for your business, are based on 5 key concepts:
- Conversion
- Planning
- Regularity
- Multichannel
- Performance measurement
By applying these 5 concrete tips, you make sure to make blogging a key medium in your digital marketing strategy.
Install and use Google Search Console
A great way to monitor the SEO health of your website is using Google Search Console.
You will receive an email notification as soon as a visibility problem is identified on your site. You can also find some tips to optimize your website.
I recommend that you install it as soon as your start your blog.
Generlly, Google Search Console will allow you :
To install Google Search Console on your WordPress site, follow these easy steps:
1. Sign into your Google account.
2. Go to Google Search Console
3. Click “Add a property.” ” To do that, paste the complete URL of your blog in one of these properties (domain or URL prefix) and click on Continue.

Quick Note
If your site supports both http:// and https://, add both as separate sites. You must also add each domain (for instance, mysite.com, blog.mysite.com, and www.mysite.com). If your website works with WWW or is using HTTP you want to add properties for these also.
4. Next, on the Verify ownership site, you will have a few of methods. We suggest you go with Google Analytics or HTML code..
If you are previously logged in ( in google analtycs ) , just click the Verify button. It will be confirm and installed by using the Google Analytics code.
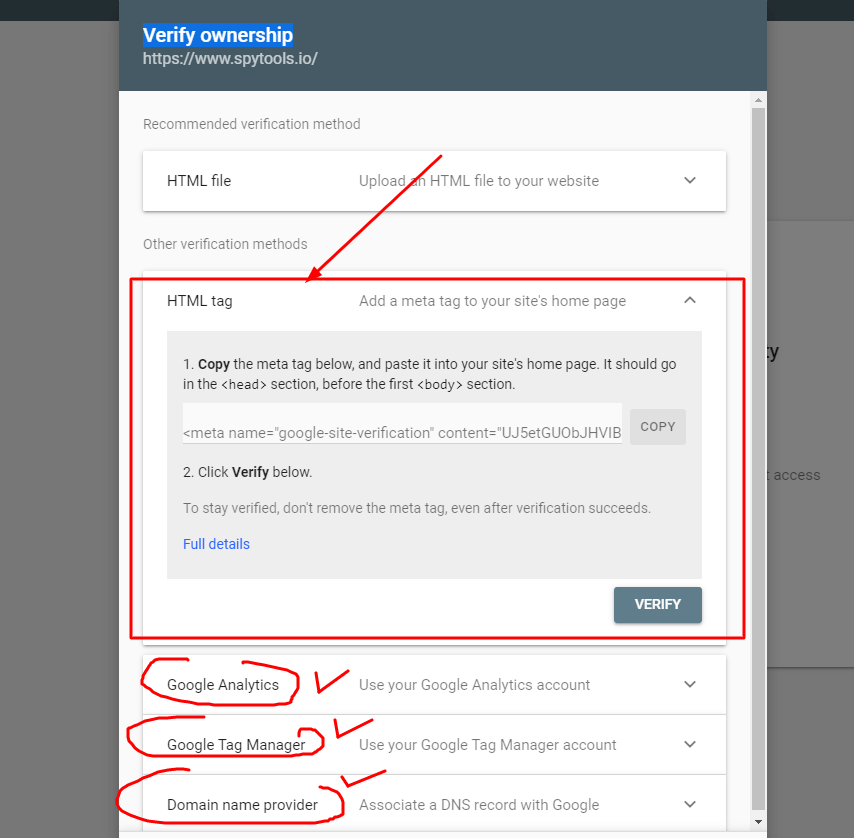
In case you dont own Google Analytics, you can pick the HTML Tag verification way.
Google will create an HTML code for you. You want to copy/paste it on your site/blog's head of home page.
Since you are using WordPress and if you are a beginner. you can access the HTML of your WordPress home page by going to Insert Headers and Footers plugin and paste the code there ( easy peasy lemon squeezy ) :

You are all done!
Once Search Console is installed, it takes at least 1 week for all the data to be collected, then navigate through the tool to familiarize yourself with it. Here's what to remember:

Combined with Google Analyzes, the Search Console offers a wealth of useful data to optimize your SEO strategy on Google.
How to Start a Blog: Frequently Asked Questions (FAQ)
Short Answer: YES
Long Answer: blogging is still very profitable. You can earn pretty big money without investing in big money or time, IF DONE THE RIGHT WAY.
Yet, I’m gonna be honest with you: It’s not profitable for all and everyone.
Several of the full-time bloggers that we know can make over $100,000 per month and work around 15-30 hours per week.
One of the most common ways bloggers make money are :
There are apparently several other ways, but these are the main methods.
So, technically, bloggers are NOT generating any return to just write blog articles.
It totally depends on your requirements. If you are only in the training stage then it is sufficient to go with services that give free blog-making like WordPress.com or Blogger.
However, if you are serious and willing to generate some money or promote your business via blogging, then you have to invest. Basically, here is what it takes to create a blog:
- Web hosting $6.95 per month ( siteground )
- Domain name $14 per year
- WordPress is Free
- Content/SEO/Growth… your time
Generally, It will cost you between 0-150 dollars for starters.
However, It seems to me that in reality, you shouldn't be questioning how much a blog costs ... but first what you expect from your blog.
Many people now still think that one can build a blog (or a website) that brings in a fortune without investing a penny in it.
But, they would see it pointless to design a more established business without investing a penny. So why think differently with blogging?
Perhaps because some people are misled by having learned miraculous success stories that provide the idea that people have gained everything without investing anything, personally or financially ...
On another level, many very bloggers are also uncomfortable with the concept of investing. Some people pay $1000 a year for a subscription to a non-sense program ... but are confused by the sense of investing $ 100 in a blog.
So I think there is also a certain change of vision to adopt regarding how to start a blog with no money.
In the case of an expert or semi-professional blogger, you must always keep in mind the ratio between the investment and the profit that you derive from it.
The best site for blogging is probably WordPress. It has proven itself for several years, and it is extremely reliable and highly customizable. People who are looking for full ownership of their blog that you intend to work in in the long-term.
Some blog niches are proven and verified/ tested to make more extra money compared to others. How?? Supply and demand formula. These are a few of the sorts of niches which make nice cash :
- Finance
- health and fitness
- Pets
- Food
- Travel
- Business and Make Money Online
- DIY and Crafts
- Self-Improvement
Now It’s Your Turn
At this point you have a fully functional blog built with WordPress. We told you that you would learn how to start a blog and make money in less than 15 minutes!
Now all you have to do is equip yourself with patience and start writing blog posts that people like to read. You will probably also want:
Learn more about WordPress SEO or get this free SEO Ebook , so that your blog ranks higher in Google Search.
Find ways of the types of blogs that make money
We hope you found this How To Start A Successful Blog is useful, and congratulations on the launch of your blog!
If you need help or have any questions, please let us know in the comments below and we will try to help you!.
Now, it’s in your hand. Why not start a profitable blog today?
Start a blog WordPress now with Hostinger
Affiliate disclaimer: Please note that this post contains affiliate links to Should you use one of my affiliate links to purchase this product I will be paid a small commission at NO additional cost to you. I appreciate your support always.


