
Effective file management is essential in today’s digital world for boosting productivity and keeping your work organized. Whether you’re a Mac expert or just starting out, knowing how to move files from your Mac to an external hard drive is a key skill. It not only saves time but also keeps your data safe and makes your work smoother.
This guide covers various methods, tools, and tips to help you become a pro at file transfer. Plus, we’ll explain why some files can’t be moved from macOS to your external drive, giving you valuable insights into managing your files better.
Whether you need to clear space on your Mac, back up important files, or simply improve your file management skills, this guide has everything you need to copy mac files to external hard drive.
Understanding the Importance of File Transfer
Before we dive into the intricacies of file transfer methods, let’s take a moment to understand why it’s essential. Transferring files from your Mac to an external hard drive serves several purposes:
Freeing Up Storage Space: As files accumulate on your Mac’s internal storage, it can slow down performance and lead to storage capacity issues. Transferring files to an external hard drive helps alleviate these concerns by offloading data onto additional storage space.
Data Backup and Protection: Data loss can occur due to various reasons such as hardware failure, accidental deletion, or system errors. By regularly backing up your files to an external hard drive, you ensure that your data is safe and can be easily restored in the event of a mishap.
File Sharing and Accessibility: External hard drives offer portability, making it easy to share files between different devices or access them on the go. Whether you’re collaborating on a project with colleagues or need to access important documents from multiple locations, having files stored on an external drive ensures seamless accessibility.
Part 1: Choosing the Right External Hard Drive
Before you can transfer files to an external hard drive, you need to select the right one for your needs. Consider the following factors when choosing an external hard drive:
Storage Capacity: Determine how much storage space you require based on the size and volume of files you plan to transfer. Opt for a drive with ample capacity to accommodate your current and future storage needs.
Compatibility: Ensure that the external hard drive is compatible with your Mac’s operating system. Most modern external hard drives are compatible with macOS, but it’s always best to double-check before making a purchase.
Portability: If you plan to transport the external hard drive frequently or use it with multiple devices, consider the size, weight, and durability of the drive. Portable drives are ideal for on-the-go use, while desktop drives offer larger storage capacities for stationary setups.
Connectivity: External hard drives typically connect to your Mac via USB, Thunderbolt, or FireWire ports. Choose a drive with a connection type that is compatible with your Mac and offers fast data transfer speeds.
Part 2: Transferring Files to an External Hard Drive
Once you’ve selected the right external hard drive for your needs, it’s time to transfer your files. There are several methods you can use to accomplish this task, each offering its own advantages and limitations. Let’s explore some of the most common methods:
If you’re looking to create space on your Mac by transferring files to an external hard drive, moving them directly rather than copying can be a time-saving strategy. This section outlines various methods to achieve this on your Mac.
Method 1: Drag and Drop with Command Key
When you drag and drop files onto an external drive on your Mac, the default action is to copy and paste the content. However, by holding down the Command key while dragging and dropping, you can initiate a move operation, which copies the files to the external drive and deletes the original copies from your Mac.
Here’s how to move files on Mac without copying them:
1. Connect External Drive: Ensure your external drive is connected to your Mac.
2. Navigate to Files: Locate the files you want to move. You can find them in various locations such as your Documents folder, Desktop, or any other directory on your Mac.
3. Select Files: Select the files you wish to move. You can select multiple files at once by holding down the Command key and clicking each file individually, or by clicking one file, then holding down Shift and clicking the last file to select a range of files.
4. Open External Drive: Double-click the icon of your external drive on the desktop to open it in Finder.
5. Move Files: While holding down the Command key, drag and drop the selected files onto the external disk. This action will move the files to the external drive.
When your external drive fails to appear on your desktop, it can be a frustrating experience. However, you can easily resolve this issue and ensure that your external drives are visible in Finder by following these steps:
1. Open Finder: To begin, locate and open the Finder application on your Mac. You can typically find Finder in your Dock or by searching for it using Spotlight (Command + Space) and typing “Finder.”
2. Access Finder Preferences: Once Finder is open, navigate to the top-left corner of your screen and click on the “Finder” menu in the menu bar. From the dropdown menu, select “Preferences.” Alternatively, you can use the keyboard shortcut Command + Comma (,).
3. Check External Disks Option: In the Preferences window that appears, click on the “General” tab. Here, you’ll find a list of checkboxes corresponding to different types of items that can be displayed on the desktop and in Finder windows.
4. Ensure “External Disks” is Checked: Scroll through the list of checkboxes until you find the option labeled “External disks.” Make sure that the checkbox next to “External disks” is checked. This ensures that external drives will be displayed in Finder when connected to your Mac.
Method 2: Keyboard Shortcuts – Command + C & Option + Command + V
Another efficient way to move files to an external hard drive on your Mac is by utilizing keyboard shortcuts. This method involves copying files to the clipboard and then pasting them onto the external drive.
Here’s how to do it:
1. Connect External Drive: Ensure your external hard drive is connected to your Mac.
2. Select Files: Select the files you want to move.
3. Copy Files: Press Command + C on your keyboard to copy the selected files to the clipboard.
4. Open External Drive: Open a new Finder window and navigate to your external drive.
5. Paste Files: Hold down Option + Command + V on your keyboard to paste the copied files onto the external drive. This action will move the files from their original location to the external drive.
Method 3: Utilizing Terminal Commands
For users comfortable with command-line interfaces, Terminal provides a powerful method for moving files to an external hard drive on your Mac. The mv command in Terminal allows you to move files from one location to another.
Here’s how to move files from your MacBook or desktop Mac to an external hard drive using Terminal:
1. Open Terminal: Launch Terminal from the Applications/Utilities folder or using Spotlight search.
2. Navigate to Files: Use the ‘cd’ command to navigate to the directory containing the files you want to move.
3. Execute ‘mv’ Command: Type the following command and press Enter:
mv your_file_path new_file_path

Replace ‘your_file_path’ with the path to the files you want to move and ‘new_file_path’ with the path to the external drive where you want to move the files.
4. Press Enter: Once you’ve entered the command, press Enter to execute it. The specified files will be moved to the designated location on the external drive.
By following these methods, you can efficiently move files from your Mac to an external hard drive without copying them, thereby freeing up space on your Mac’s internal storage while ensuring your important data is safely stored on an external drive.
Method 4. Use Third-party Software to Quickly Transfer Files from Mac to External Hard Drive
If you’re seeking the simplest method to transfer files from your Mac to an external hard drive or flash drive, consider utilizing iBoysoft MagicMenu. This utility serves as a powerful enhancement to your Finder context menu, allowing seamless right-click actions to copy or move selected files to any location on your Mac.
Furthermore, iBoysoft MagicMenu provides a wide array of supplementary features beyond just file transfers. It equips users with the ability to compress files, convert images, remove duplicate photos or files, uninstall applications completely, capture screenshots, and generate new files or folders, among various other capabilities. With its versatile toolkit, iBoysoft MagicMenu enhances user productivity and simplifies various tasks, making it a valuable addition to any Mac user’s workflow.
To swiftly transfer files to an external hard drive on your Mac, follow these steps utilizing iBoysoft MagicMenu:
Step 1. Download and Install iBoysoft MagicMenu: Begin by downloading and installing iBoysoft MagicMenu for free from the designated source.
Step 2. Select Files for Transfer: Choose the files you wish to move or copy. Utilize the Command key to select multiple files simultaneously, or hold down Shift and click the last file to select files in between.
Step 3. Perform Right-Click Action: Right-click on the selected files, and from the context menu, opt for either “Copy To” or “Move To” as per your preference.

Step 4. Choose Destination: Upon selecting the desired action, designate your external hard drive, thumb drive, or flash drive as the destination for the file transfer.
By following these straightforward steps and leveraging the capabilities of iBoysoft MagicMenu, you can expedite the process of transferring files from your Mac to an external storage device with ease and efficiency.
Part 3. Some Methods to Copy Files from Mac to External Hard Drive
When it comes to safeguarding your important files and creating backup copies on an external hard drive, there are several methods you can utilize on your Mac. Each method offers its own set of advantages and can be tailored to suit your preferences and requirements. Let’s explore these methods in detail to understand how to copy files from your Mac to an external hard drive seamlessly.
Method 1: Drag and Drop
This method offers a simple and intuitive way to copy files from your Mac to an external hard drive.
-
- Connect External Drive: Begin by plugging your external hard drive into your Mac’s USB port.
-
- Access External Drive: Double-click on the disk icon of your external drive to open it on your desktop.
-
- Locate Files: Navigate to the location on your Mac where the files you want to copy are stored.
-
- Select and Drag: Select the files you wish to copy, then drag and drop them into the window of your external drive. The files will be copied to the external drive, leaving the original files intact on your Mac.
Method 2: Keyboard Shortcuts (Command + C & Command + V)
For users who prefer using keyboard shortcuts, this method offers a quick and efficient way to copy files.
-
- Select Files: Choose the files you want to copy from your Mac.
-
- Copy Files: Press Command + C on your keyboard to copy the selected files to the clipboard.
-
- Access External Drive: Open your external drive where you want to paste the copied files.
-
- Paste Files: Press Command + V on your keyboard to paste the copied files into the external drive. This action duplicates the files onto the external drive while keeping the original files on your Mac intact.
Method 3: Terminal Command (cp Command)
For advanced users comfortable with command-line interfaces, Terminal provides a powerful tool for copying files directly from your Mac to an external hard drive.
-
- Open Terminal: Launch Terminal from the Applications/Utilities folder on your Mac.
-
- Navigate to Files: Use Terminal commands to navigate to the directory containing the files you wish to copy.
-
- Execute Copy Command: Enter the following command and press Enter:
cp your_old_file_path new_file_path
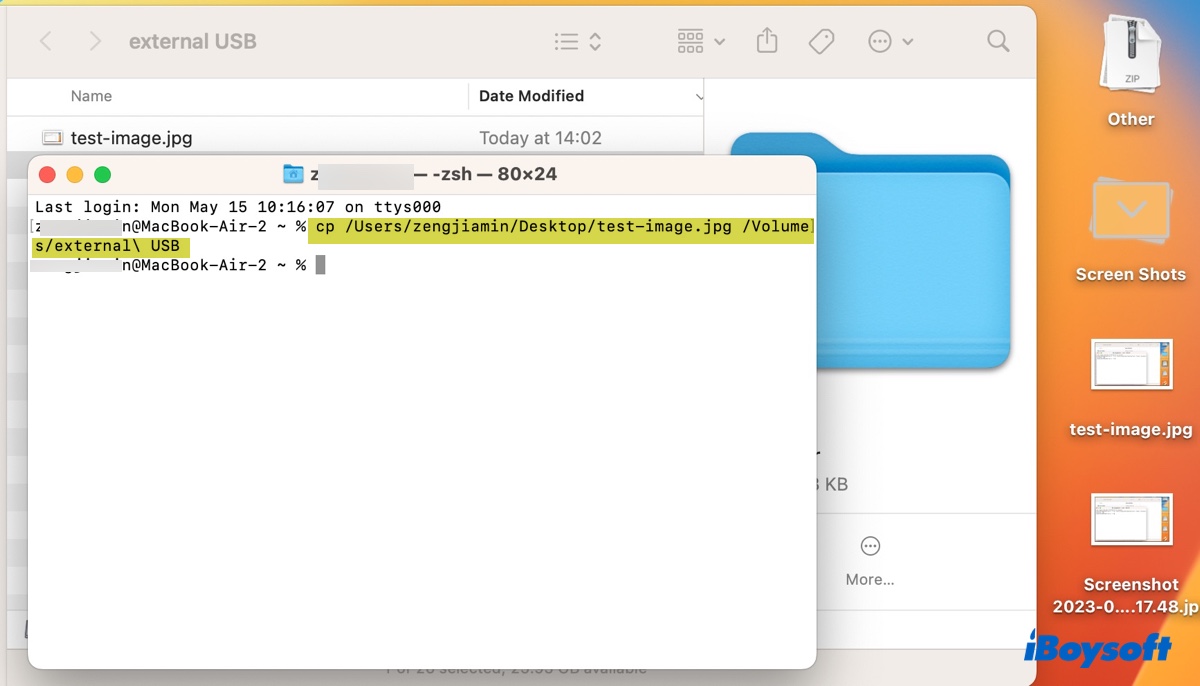
Replace “your_old_file_path” with the path to the files you want to copy and “new_file_path” with the destination path on the external drive.
Alternatively, you can drag the files you want to copy from Finder into the Terminal window to automatically populate the file paths.
Method 4: Time Machine Backup
Time Machine is a built-in macOS backup utility designed to create automatic backups of your entire system, including files, applications, and system settings.
Set Up Time Machine: Connect your external hard drive and configure Time Machine to use it as the backup destination.
Initiate Backup: Time Machine will automatically start backing up your Mac’s files to the external hard drive according to the backup schedule you’ve set.
Restore Files: In the event of data loss or system failure, you can easily restore files from your Time Machine backup to your Mac.
Part 4. Why Couldn’t I Move Files from Mac to External Hard Drive Using NTFS Format?
Facing problems when you can’t add files to external hard drive on Mac, especially if it’s formatted with NTFS, can be really frustrating. This issue may arise due to various factors, such as compatibility issues with the file system, insufficient write permissions, or file transfer restrictions. To address these challenges effectively, consider the following solutions:
1. Assess Your Drive’s File System
Begin troubleshooting by examining the file system of your external hard drive using Disk Utility. Follow these steps to conduct the assessment:
Activate Disk Utility: Utilize Spotlight search by pressing Command + Space and typing “Disk Utility.” Launch the Disk Utility application.
Select External Drive: Identify and select the partition or volume of your external disk within Disk Utility.
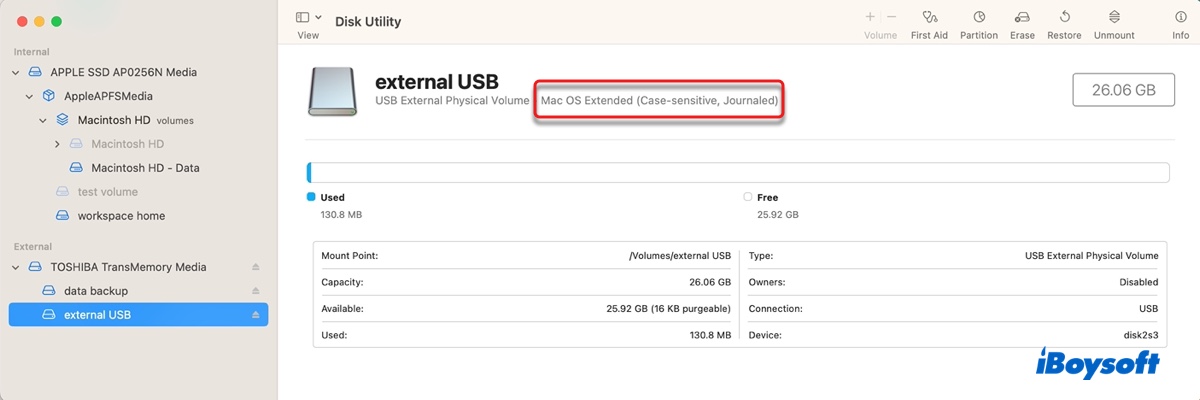
Check File System: Review the displayed file system information beneath the drive name. If the file system is NTFS, which is primarily utilized by Windows and not fully writable on macOS, you’ll need to explore alternative solutions.
Solution A. Utilize iBoysoft NTFS for Mac
For seamless file transfers between your Mac and an NTFS-formatted external drive, consider employing iBoysoft NTFS for Mac. This third-party driver facilitates read and write capabilities to NTFS drives on macOS, enabling effortless file management. Here’s how to utilize it:
-
- Download and Install: Obtain iBoysoft NTFS for Mac from a trusted source and follow the on-screen instructions for installation.
-
- Copy Files: Once installed, proceed to copy or move files from your Mac to the NTFS drive using the methods described earlier.
Solution B. Reformat Your NTFS Drive
Alternatively, if the data on your NTFS drive isn’t critical, you can opt to reformat it with a compatible file system using Disk Utility. Consider the following options:
APFS: Suitable for macOS High Sierra or later, particularly optimized for SSDs with advanced features like snapshots and encryption.
Mac OS Extended (Journaled): Ideal for Mac-only usage when APFS isn’t supported.
FAT32: Suitable for cross-platform compatibility between macOS and Windows, provided individual file sizes don’t exceed 4GB.
ExFAT: Offers optimal compatibility for both macOS and Windows environments.
2. Verify Drive Permissions
Lack of sufficient write permissions on the external drive can hinder file transfers from your Mac. To resolve this problem:
-
- Access Drive Information: Right-click on the drive icon either on your desktop or within Finder’s sidebar and select “Get Info.”
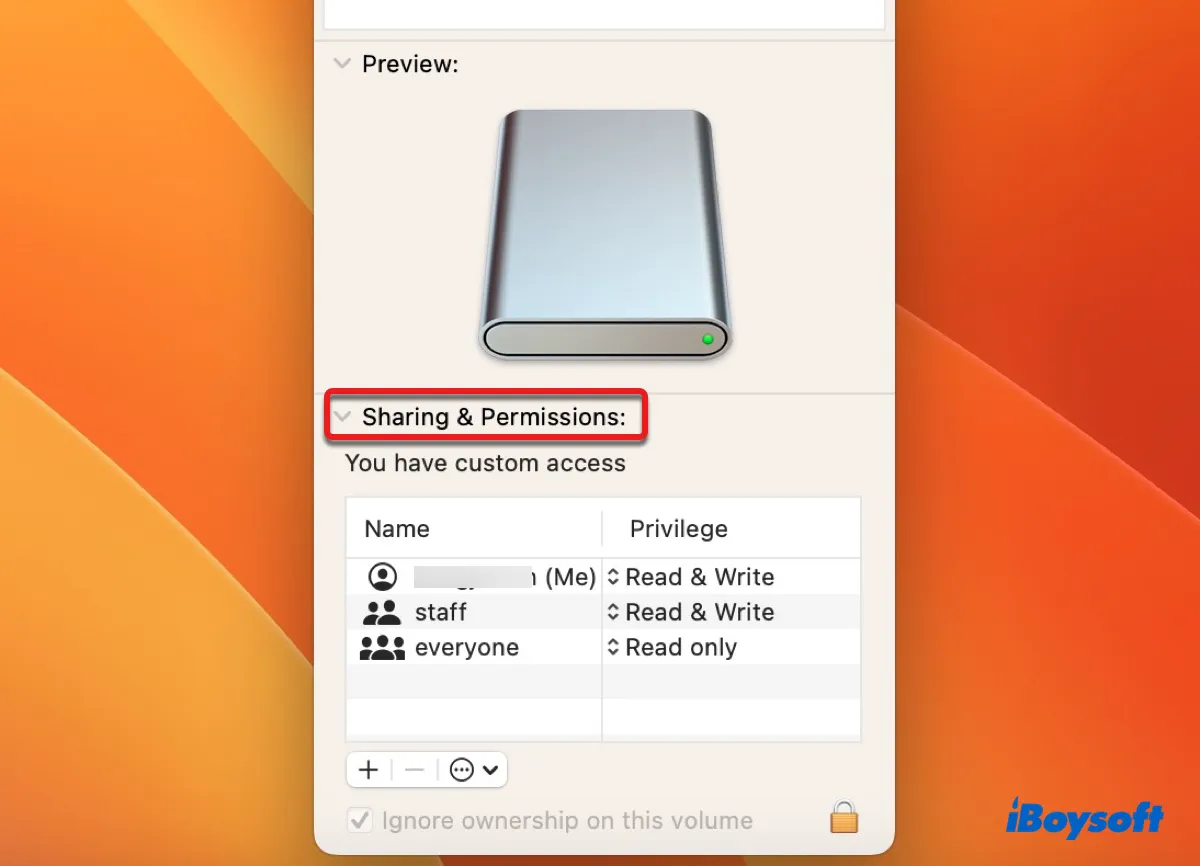
Check Sharing & Permissions: Review the permissions settings displayed. If your current account lacks Read & Write privileges, adjust the settings accordingly to grant the necessary permissions.
Part 5. Scenarios When You Can’t Move Files to External Drives
Understanding the limitations of file transfers from your Mac to an external drive is crucial for smooth data management. While most files can be easily transferred, there are certain exceptions to be aware of:
System Files:
System files play a critical role in the operation and stability of the macOS operating system. These files are typically protected to prevent inadvertent changes or deletions that could potentially disrupt system functionality. By restricting access to system files, macOS ensures the integrity and security of the operating system. Attempting to copy or move system files to an external drive is often prohibited to safeguard against accidental modifications that could compromise the stability of the system.
Files Currently in Use:
When files are actively being accessed or utilized by other applications or processes on your Mac, they may be locked or in a state that prevents them from being transferred to an external drive. This is because transferring files that are in use could lead to data corruption or inconsistencies. In such situations, macOS restricts the transfer of these files to safeguard data integrity. Restarting your Mac or relaunching Finder can sometimes release the hold on these files, allowing them to be transferred once they are no longer in use.
Large Files Exceeding File System Limits:
File systems impose limitations on the maximum size of individual files that can be stored. For example, the FAT32 file system, commonly used for compatibility across different platforms, has a maximum file size limit of 4GB. Attempting to copy a file larger than this limit to a FAT32-formatted external drive will result in a transfer failure.
In such cases, users may encounter errors indicating that the file exceeds the file system’s maximum size. To overcome this limitation, users can either split the large file into smaller parts or utilize a file system that supports larger file sizes, such as exFAT or NTFS. By using a compatible file system, users can ensure seamless transfer of large files to external drives without encountering size restrictions.
Encrypted Files:
Files that are encrypted using macOS’s built-in FileVault encryption or third-party encryption software may not be transferred to an external memory device unless the encryption is disabled or the recipient device supports decryption of the files.
Corrupted Files or File Systems:
Files that are corrupted or located on a corrupted file system may encounter errors during transfer attempts. macOS may prevent the transfer of corrupted files to avoid further data corruption or loss. Repairing the files or file system using disk repair utilities may be necessary before attempting the transfer.
File System Errors on External Device:
Issues with the file system of the external memory device, such as corruption or formatting errors, can prevent files from being transferred. macOS may detect these errors and restrict the transfer to prevent data loss or damage. Resolving the file system errors using disk repair tools or formatting the external device may be required to enable file transfers.
Next: 24 Best Facebook Ads Spy Tools For Higher ROI
Conclusion
One easy way to make sure your important data is safe and accessible for the long haul is to copy mac files to external hard drive. You may rely on it as a backup solution, and it also helps clear up space on your Mac’s internal storage, which improves its overall speed.
You now have all the information and resources necessary to move your files without a hitch, thanks to this detailed instruction. Following the detailed steps guarantees a safe and easy transfer, regardless of your level of experience with Macs.